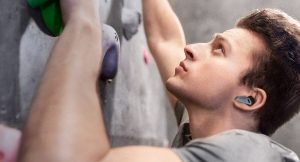
The beauty of being a new climber is that you can choose to own as much or as little gear as you like. You may even opt for no gear.
Renting equipment from an indoor gym can be a helpful way to familiarize yourself with different brands, types, and styles. However, choosing the right gear for you ultimately depends on personal preference and safety.
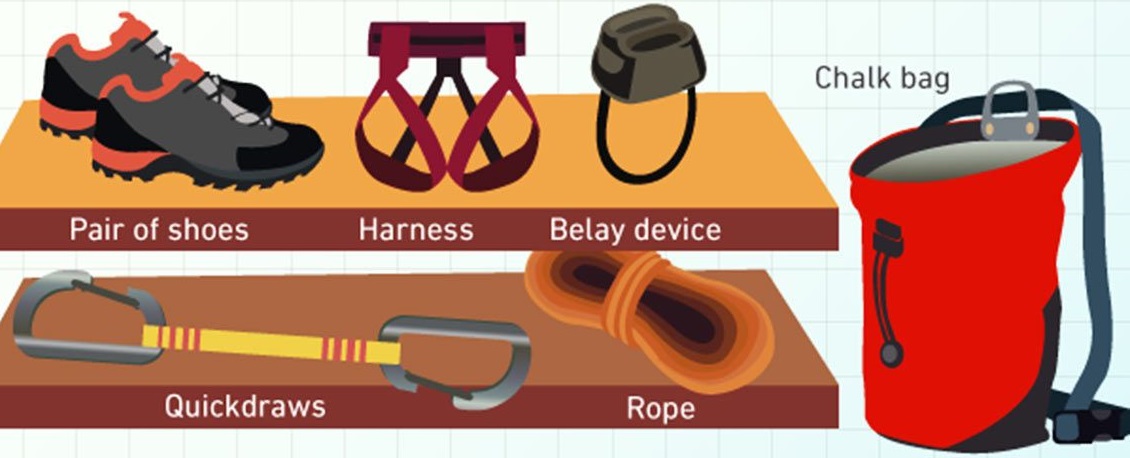
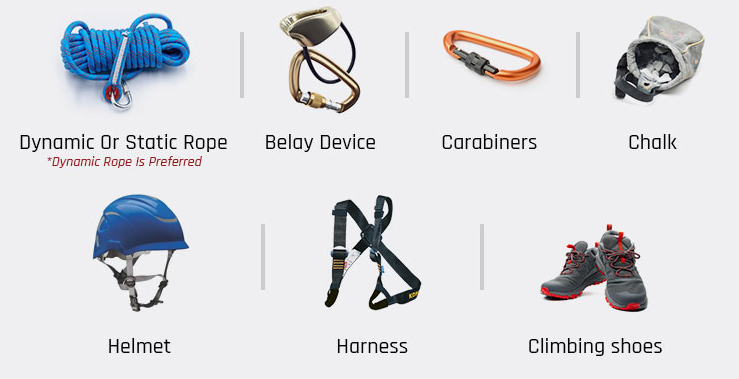
Having the proper equipment is arguably one of the most vital factors in rock climbing. A climber puts great trust in their gear; therefore, you should always buy high-quality equipment meant exclusively for climbing.
In this article, we will only discuss the necessary equipment needed for bouldering and top-rope climbing. Climbing such as sport and traditional is considered more advanced.
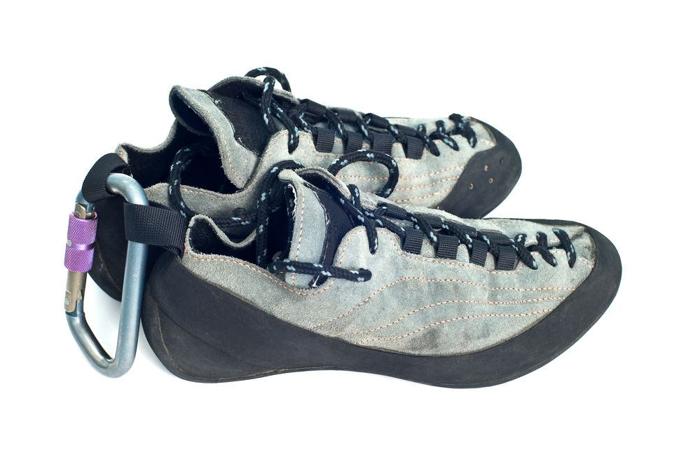
Climbing Shoes
Shoes are often considered the most critical equipment a climber can buy.
Shoes comprise a heel cup, the soles, the rand (the rubber that covers the toe), the upper, and the insole. Climbing shoes come in an assortment of styles, Velcro or lace-up, synthetic or leather uppers. The thickness of the rubber varies.
Although hundreds of climbing shoes are available, picking your first pair does not have to be complicated.
Selecting Shoes
Climbing shoes come in three main types:
- Neutral
- Moderate
- Aggressive
It is common for climbing shoes to be worn a half size to two sizes down from your regular footwear. Such a large size range makes it imperative to try on the shoes. Also, consider that new shoes stretch out after use.
When selecting a shoe, it should fit snugly, with no dead space around the foot. A shoe that fits too big will cause the foot to slide around within the shoe, resulting in sloppy climbing.
Despite fitting snuggly, the shoes should still feel comfortable after several hours of wear. For novice climbers, a neutral “all-around” shoe is preferable.
All-around shoes are as they sound; they are versatile and can be used in many types of climbing. Whether climbing indoors, outdoors, on granite, or sandstone, an all-around rock climbing shoe will have you covered.
Proper Use of Shoes
Climbing shoes should come to feel like a second skin on your feet. Some climbers choose to wear socks with their shoes, while others prefer none for increased sensitivity. Whether you wear socks or not is simply a matter of preference.
A key point to remember is that climbing shoes are never to be worn for hiking or walking on a rough trail. While walking around an indoor gym is fine, most outdoor terrain can quickly wear out your shoes when used for activities other than climbing.
It is common for a climber only to wear shoes when they are ready to ascend. Likewise, the belayer frequently wears regular shoes while belaying and then changes to climbing shoes when prepared to climb.
Also, take care to never walk around with only your toes slipped into the shoe, as this will quickly degrade the heel cup.
Caring for Your Shoes
Active climbers may go through as many as two pairs of shoes a year, while more avid climbers may go through three or more pairs. Buying shoes frequently can become pricey; therefore, adequate care of your shoes will go a long way in helping them last and perform longer.
Beware that climbing shoes worn without socks can lead to a nasty odor, so it is essential to air your shoes out immediately after climbing. Allowing your shoes to dry out will not only minimize odors but also prevent bacteria and mildew growth. It may be beneficial to use deodorizing foot powder or sprays.
Never store shoes in direct sunlight or excessive heat. Heat can weaken the glue and cause the rubber to break down.
Always store shoes in a cool, dry place. After climbing, wipe the soles and rand lightly with a wet rag to remove excess dirt, and then wipe dry thoroughly.
Dirty uppers can be spot-cleaned with rubbing alcohol or a small amount of water. If you have shoes with leather uppers, do not clean with excess water, as this can cause the leather to break down.
Safety Inspection
Be sure to inspect areas of high wear on the soles and rands regularly. Keep an eye out for thin or pitted areas in the rubber.
Areas of high-wear include the toe area and ball of the foot, as well as where the sole meets the rand. Always replace your climbing shoes or have them re-soled as soon as you find excessive wear and tear.
Dirty shoes or shoes with excessive wear will cause the climber to have less grip on the rock.
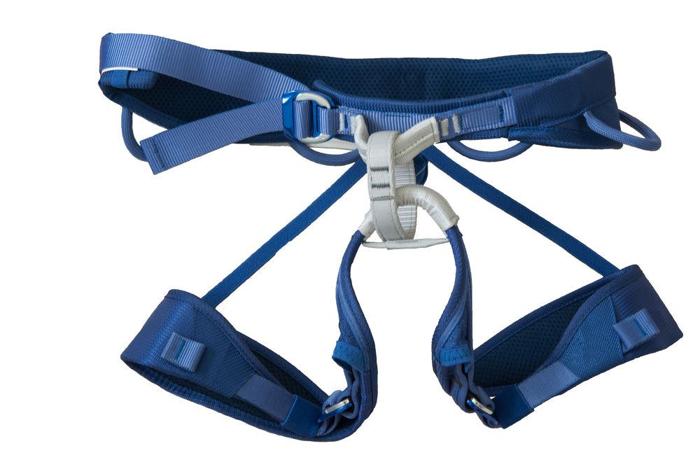
Climbing Harness
The climbing harness is another critical piece of equipment, and when chosen well, can provide years of climbing safety and comfort.
Like shoes, harnesses come in a variety of brands and styles.
- An “all-around” harness
- A gym harness
- Alpine and big wall harnesses
The standard climbing harness comprises a waist belt and leg loops made of durable nylon webbing. It also includes safety buckles, a belay loop, gear loops, and two tie-in loops or hard points. Also, harnesses may be either padded or non-padded, specific to men or women.
Selecting a Harness
Generally, the type of climbing will determine the proper harness. In the case of the new rock climber, an all-around harness is the harness of choice, as this is a traditional multipurpose harness.
These types of harnesses are almost always padded and feature adjustable waist and leg loops for added comfort and a perfect fit. Finding a quality fit in a climbing harness is vital.
To fit a harness properly:
1. Begin with the waist and leg loops entirely loosened, if adjustable.
2. Step into the harness by stepping into the waist belt and leg loops, as you would step into pants. Situate the waist belt so it sits above the hip bones and then securely tightens.
You should never be able to pull the harness below your hips. A harness that can be drawn below the hips may cause the climber to slip out easily. To ensure the waist belt is secure, you should have a two-finger gap between your waist and the waist belt.
3. Finally, double back the buckle of the waist belt.
4. After securing the waist belt, adjust the leg loops one at a time. The placement of the leg loops is based more on comfort than safety. However, they should fit snugly around your legs.
The leg loops should not pinch, slip, or restrict the climber’s movement. Leg loops that are snugger will allow you to feel comfortable while hanging freely in the harness. In contrast, looser leg loops are not as soft when hanging freely.
Without testing a harness, you cannot accurately tell if it will be comfortable or an accurate fit. Most sports and recreation stores and indoor gyms will have a testing area to allow you to try the harness out.
To test a harness, sit in it, or put weight on it. The harness should not have obvious pressure points, dig into you, or shift excessively.
A quality weighted harness will remain comfortable when sitting upright, similar to sitting in a chair.
Proper Use of a Harness
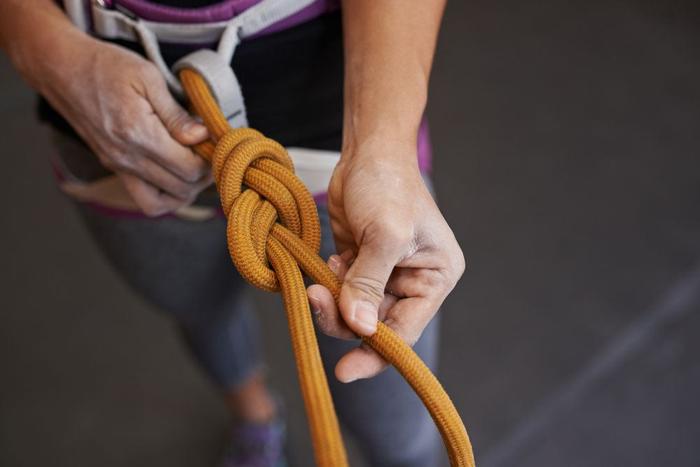
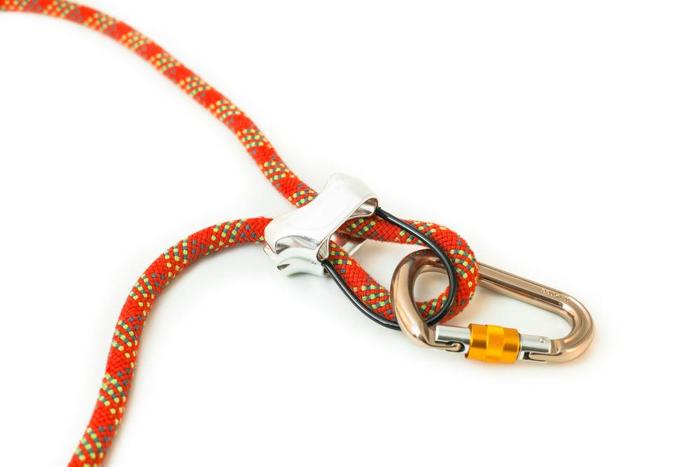
The harness utilizes the waist and leg loops to attach your body to the climbing rope. A figure-eight knot is tied in the climber’s end of the line to connect the harness to the climbing system.
First, the tail of the figure-eight is passed through the leg hardpoint, located below the belay loop.
Next, the same tail end is passed through the waist hardpoint, situated above the belay loop.
Finally, the tail end of the rope is traced back through the figure-eight in the line, creating a secure figure-eight knot.
The belay loop on the harness connects the waist belt and leg loops. Belay loops are attached to a belay device via a locking carabiner. The belay loop is also the attachment point for the carabiner in an auto-belay system.
To the rookie climber, this exercise of using a harness may sound puzzling. However, there is plenty of guidance and practice tying-in in an introductory climbing class provided by a climbing gym or sports and recreation store.
Caring for a Harness
Depending on how frequently and the conditions in which you climb, the nylon webbing will degrade and weaken over time.
A standard climbing harness can last roughly three years with proper care and maintenance. This lifespan may be reduced or extended depending on how well the harness is maintained.
A climbing harness should be stored in a dark, dry location, away from sharp objects. Take care to keep the harness away from gasoline and other corrosive substances such as bleach, solvents, or battery acid. These substances can quickly degrade the life of the harness.
Ideal storage should be out of direct sunlight and excessive heat, preferably in a harness bag.
For a dirty harness, rinse it with water. You may gently hand wash the harness if rinsing fails to remove dust and debris.
Use warm water and mild soap only, and never use bleach. After being hand-washed, the harness should be rinsed and hung to drip-dry away from direct sunlight.
Safety Inspection
Regular climbing will wear a harness out, and repeated strenuous falls can weaken tie-in points.
To ensure maximum safety, you should make it a habit to inspect the harness for signs of damage before and after each trip to the crag. Inspect the harness for things such as frays, tears, rips, holes, or abrasion in the webbing.
Look for buckles that are cracked or damaged in any way. Be mindful of any faded areas, as this means the webbing has faded due to sun exposure.
Any harness involved in a severe fall should be retired immediately, even if there is no visible damage. Likewise, if you have doubts about your harness’s reliability, retire it immediately.
It is considered good practice to destroy any gear you have doubts about to prevent possible use by others.
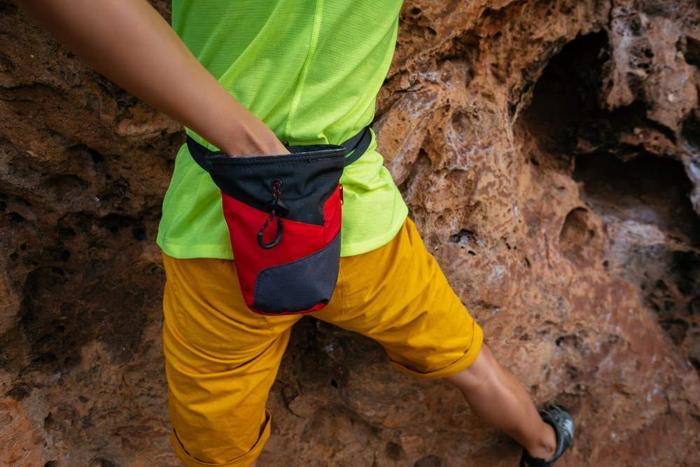
Chalk and Chalk Bag
As a climber, you will find that your hands are prone to sweating under certain conditions. Your hands will sweat when the weather is hot and humid, and when you are new to climbing, your palms get sweaty when the route is scary.
As you can imagine, wet hands make for a terrible grip on the rock. For this reason, climbers use chalk to absorb moisture and keep their hands dry.
As straightforward as chalk and bags are, there are still several options available for both.
Types of chalk include:
- Loose
- Block
- Liquid
- Eco chalk
Bags include small and standard-size bags and chalk buckets. Even with minimal considerations, the type that you pick is an entirely personal preference.
Selecting Chalk
Over-analysis when selecting chalk and a bag is not necessary. It is okay to pick chalk based on how it feels and which form you prefer.
Types of chalk include:
Loose chalk – Loose chalk is chalk that is ground up and placed in a bag or bucket. It may come as pure chalk or chalk that contains drying agents.
Chalk balls – Chalk balls are porous sacks designed to keep the chalk from spilling. Place the chalk ball in your bag and rub it on your hands as needed.
Block chalk – Block chalk is chalk in a substantial chunk, requiring crushing. Block chalk can be crushed to the desired consistency and is less messy to transport before breaking.
Liquid chalk – Liquid chalk is a chalk-alcohol blend for rubbing on the hands. Once the alcohol dries, a chalk residue forms on the hands. This type of chalk is less messy and reduces marks on the rock.
Colored chalk – Colored chalk is chalk that matches the color of the rock for less of a visual impact. Many non-climbers do not view a chalk-covered crag as attractive. Likewise, a build-up of chalk creates a slippery surface for the climber.
Eco chalk – Developed in response to concerns over the dirtying of rock surfaces, eco chalk uses a colorless drying agent.
Selecting a Chalk Bag
There are no frills here. A chalk bag is simply a reservoir to hold loose chalk or balls.
Packs consist of a strap worn around the waist. Another option for wear is clipping it to the waist belt of the harness.
Bags come in small sizes, meant for those with little hands, and standard sizes. Buckets are not intended to be carried by the climber but instead sit on the ground. Buckets for dipping the hands into are ideal for groups of boulderers.
Optional bag features include:
Cord closure – The cord closure prevents chalk from spilling out of the bag.
Fleece lining – The fleece lining helps to hold down the chalk dust. It also aids in evenly distributing the chalk on your hands.
Stiff rim – The thick lip on the bag helps to hold the bag open. It allows the climber’s hand to slip in and out quickly.
Zippered pocket – Some bags feature a zippered pocket for holding items like keys or lip balm.
Brush loop – This feature holds a brush, allowing the climber to easily clean chalk off of holds.
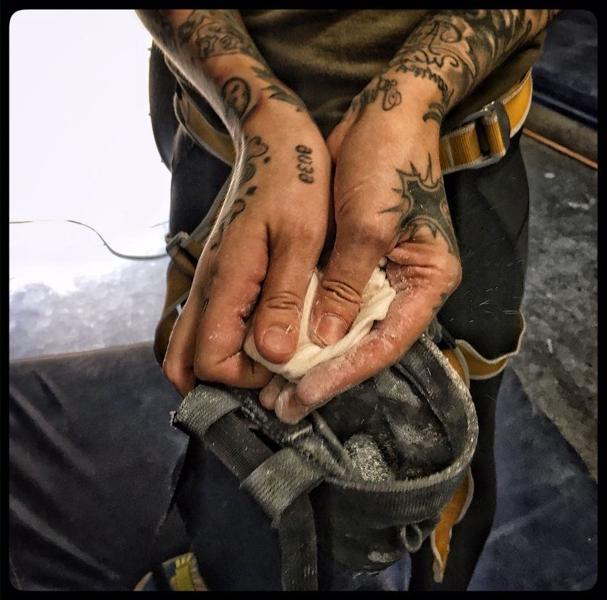
Proper Use of Chalk and Bag
Unless you are using liquid chalk, other types of chalk may be placed in a bag and used as needed. Apply the chalk by dipping your hands into the bag one at a time.
Spread the chalk over your palms and fingertips. Allow the excess chalk to pour back into the bag. Blow away any loose particles, so a smooth chalk layer covers your hand.
When using chalk, leaving no chalk trace behind is considered good practice. Leaving chalk smears and tick marks is poor etiquette.
When climbing outdoors, use chalk sparingly and always carry a brush to remove any excess. Always ask about using chalk, as some climbing areas prohibit it altogether.
Hand Care
Chalk helps the climber hang on longer, but it is also tough on the skin. Having a hand care routine is imperative.
Always wash your hands with soap and cold water after climbing, which will help with callus management. Keep in mind blisters will be inevitable as a new climber.
Here are some tips to try for healthy hand management:
Nail Clipping – Nails should preferably be clipped and maintained before climbing.
Filing – Using a file or sanding block on the hands and the nails will help to file down any nicks or rough spots. Filing helps to prevent skin from catching on holds and ripping open.
Hand salve – A nourishing hand salve will keep your hands moist and elastic while helping to prevent cracks.
Athletic tape – Athletic tape may protect the fingers, wrist, and hand and provide extra support.
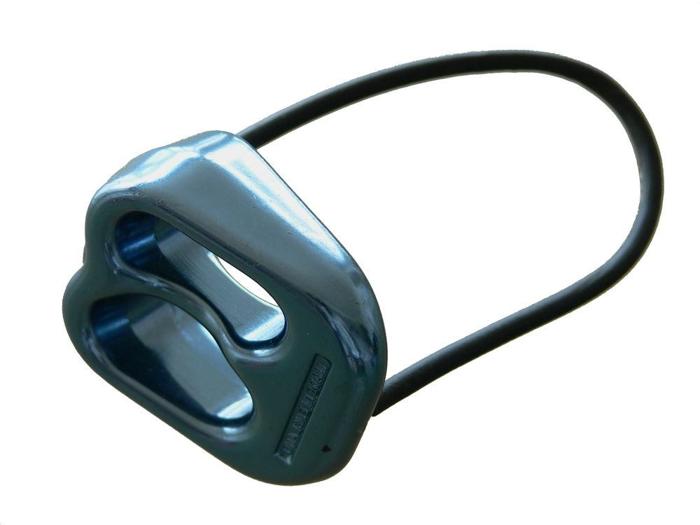
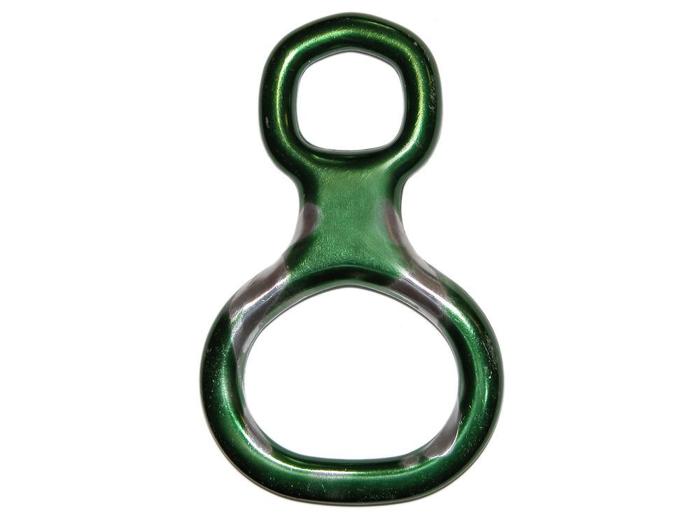
Belay Device
A belay device lets the belayer control the rope by applying friction and drag to it. The tool and the belayer’s brake hand, helps maintain tension on the line to hold, lower, and catch the climber in a fall.
Another use of the belay device is rappelling, making this device a crucial tool for safe climbing.
When selecting a belay device, there are three types:
- Tubular
- Figure-eight
- Assisted braking
Most devices have two holes for the rope to make it easy for left or right-handed people. Although the model you choose will depend on the type of climbing you do, the tubular belay device is the most popular and widely used.
Selecting a Belay Device
Not only are tubular belay devices popular, but it is most likely the device you will be trained to use in an introductory climbing class.
Tubular devices are best for indoor gyms, sports, and multi-pitch traditional climbing. They are generally light, compact, and easy to use.
They accommodate a range of rope diameters and prevent the rope from twisting or kinking. Tubular devices can also be used for rappelling, although some climbers find this application to be too slow.
Figure-eight belay devices are used primarily for rappelling as well as caving and search and rescue. They may be fashioned to belay a leader or top-rope climber, but you are not likely to see this device in an indoor climbing gym.
They efficiently dissipate the heat caused by friction and work with almost any rope diameter. One drawback is that it puts a twist on the climbing rope, making handling more difficult. They also require more attention from the belayer and more force from the brake hand than other devices.
Assisted braking belay devices are best for the gym, sport, and multi-pitch traditional climbing. They are also called self-locking or auto-locking devices. These devices are designed to lock down on the rope when a sudden force is applied, allowing the belayer to catch and hold a fall.
Assisted devices generally feed the line smoothly but may not work with all rope diameters. Although they may seem more convenient, these devices can be bulky and are often not allowed in climbing gyms.
Proper Use of a Belay Device
As a rookie climber, you will not likely immediately learn to use a figure-eight or assisted braking belay device. These types of devices are considered more advanced and require expert training.
We will focus solely on the tubular style belay device for this instruction.
The rope is folded and pushed through one side when setting up a belay device. The device and rope are clipped with a locking carabiner to the belay loop on the belayer’s climbing harness or an anchor. The friction caused by the rope’s contact with the belay device slows the cable to protect the climber.
Do not worry if this information feels hard to grasp. In an introductory climbing class, you will receive plenty of guidance and practice with connecting a belay device to the climbing system and belaying for a climber.
Caring for a Belay Device
There is not much maintenance needed for a belay device, considering its heavy use. Belay devices are generally reliable, as they are made from heavy aluminum or alloy.
Never leave your belay device near anything that could be potentially corrosive or reduce its lifespan. Use your best judgment to protect your devices as you would protect any of your climbing gear.
Safety Inspection
Inspect belay devices for corrosion, cracks, and sharp edges regularly. Check for excessive wear and any loose, bent, or missing pieces.
If you have any doubt regarding the safety and reliability of the belay device, retire it immediately.
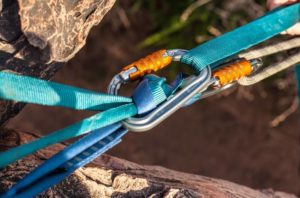
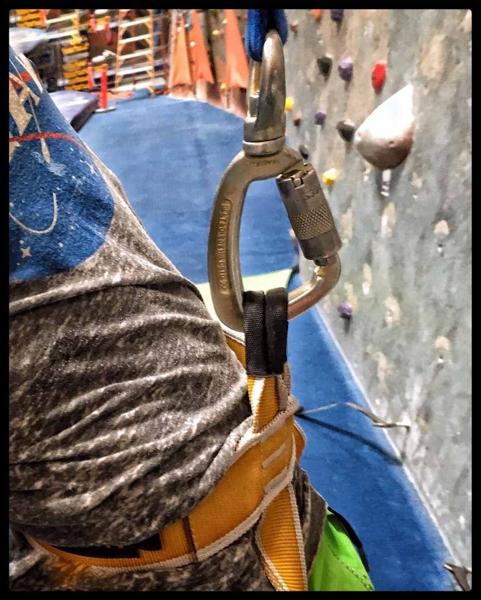
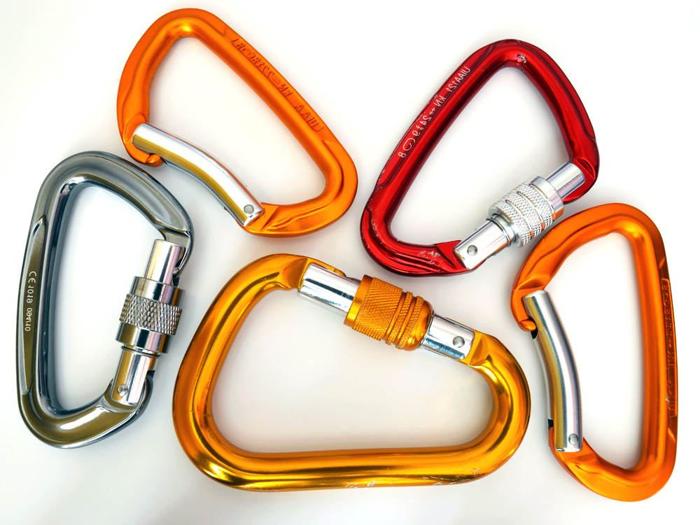
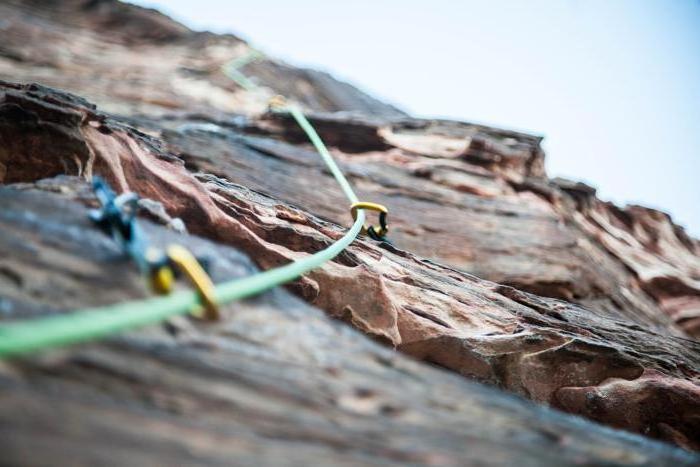
Carabiners
The carabiner serves many roles in climbing. It is essential for linking equipment into a safety system. It consists of a frame and a spring-loaded gate that opens for attachment.
Carabiners come in different shapes, such as:
- D
- Asymmetric D
- Pear
- Oval-shaped
They also feature different gate styles like:
- Straight
- Bent
- Wire
- Locking gates
Carabiners are durable, lightweight, and made from aluminum or steel.
Selecting Carabiners
Different climbing tasks call for specific types of carabiners. Therefore, when choosing a carabiner, you should consider the shape, gate type, size, strength, and weight.
Here is a breakdown of carabiner shapes:
D – The D-shaped carabiner is considered the most robust shape and ideal for most types of climbing. It concentrates the force on the carabiner’s spine, allowing for increased strength. It has a larger gate opening than an oval shape, but a smaller gate opening than the asymmetric D shape.
Asymmetric D – Asymmetric D is considered the most popular carabiners design. This type of carabiner works like the regular D-shape, with the load put on the spine, but they have a narrow top end. This smaller end helps to reduce weight further. Asymmetric D-shaped carabiners are lightweight and robust and have large gate openings.
Pear – Pear-shaped carabiners are used mostly for belaying and rappelling. They have large gate openings for easy clipping but are more substantial than most other shapes. A standard pear-shaped, locking carabiner is preferable if you are unsure of what style you need.
Oval – Oval carabiners are ideal because the uniform curves limit load-shifting. Some drawbacks are that they are heavier and have a smaller gate opening. Once you have a basic understanding of shapes, consider gate styles. Here is a breakdown of carabiner gate types:
Straight – Carabiners with straight gates have a variety of uses and are the most common. They are durable, easy to use, and can be found on quickdraws or for racking gear. Straight-gate carabiners are less likely to come unclipped.
Bent – Bent-gate carabiners have a curved gate, making clipping rope fast and easy. They are typically used in sport climbing for the rope-end of quickdraws.
Wire – Wire-gate carabiners utilize a loop of steel for the gate. This style allows for a full gate opening. They are ideal for climbing in wet, cold weather because they are less likely to freeze shut or to open in a fall than other types of gates.
Locking – Locking-gate carabiners, as the name implies, have gates that lock closed. They may be either screw-locking or auto-locking. Auto-locking gates automatically lock when the gate closes, while screw-lock gates are locked by turning the attached sleeve. Locking carabiners are the gold standard for use with belay and rappelling devices, as the locking gate adds security.
Proper Use of Carabiners
For top-rope climbing, the carabiner is used for belaying a climber. The carabiner attaches to the belay loop of the harness.
The carabiner must pass through the belay device and the rope, before being attached to the belay loop. Always ensure the carabiner remains locked for added safety.
Caring for Carabiners
Fortunately, carabiners require very little maintenance. Always keep carabiners away from excessive heat.
Dirty carabiners can be washed in warm water and thoroughly dried before storage. Occasionally spraying the gates with a lubricant may be helpful, but any excess must be wiped off.
Use your best judgment to protect your carabiners as you would protect any of your climbing gear.
Safety Inspection
Regularly inspect the carabiner for excessive wear and any loose, missing, or faulty parts. Check for corrosion, cracks, and sharp edges.
Never drop a carabiner, as this can cause damage on impact. The gate and locking mechanisms should operate easily, and locking sleeves should remain closed.
Never leave your carabiner near anything that could be potentially corrosive or reduce its lifespan. If you doubt the safety and reliability of the carabiner, retire it immediately.
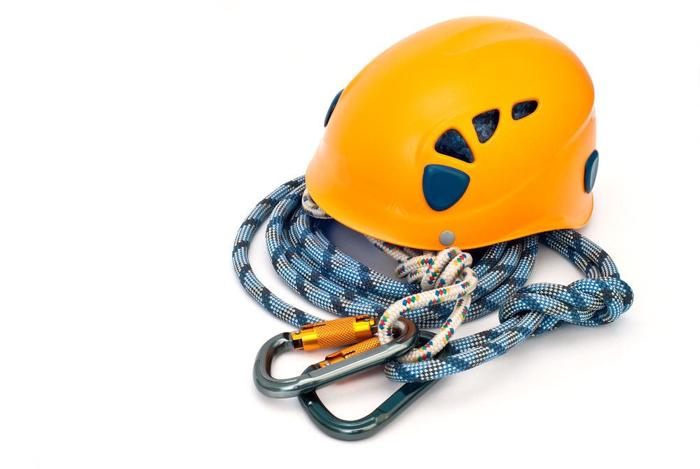
Climbing Helmet
If you are learning to climb outdoors, you may also want to consider purchasing a helmet, rope, and crash pads. Also, you may need to consider items for creating anchors.
To ensure maximum safety, you should always climb with a helmet while climbing outdoors. Helmets protect against falling rocks and dropped equipment and prevent head injuries by absorbing energy under the impact.
When choosing a helmet, you should consider the type, fit, and style of climbing you do.
Selecting a Helmet
There are two main types of climbing helmets, hardshell and shelled foam helmets.
Hardshell helmets may also be called suspension or hybrid. Hybrid helmets are the most common type and consist of an outer hard plastic shell and an inner suspension system. The internal suspension system allows the helmet to float on the head. Hardshell helmets are inexpensive and have a long life lifespan.
Shelled foam helmets are lightweight and sit directly on the head. They consist of a thick layer of foam for absorbing impact shock. They are less durable than a hardshell helmet, making them ideal for a climbing gym if a helmet is required.
Trying different styles is the best way to determine if the helmet fits properly. The helmet should remain secure and snug when you shake or tilt your head from side to side, forward and backward. Adjust any buckles or chin straps so that there is no slack.
Proper Use of Helmets
Helmets should fit securely on the head and cover both sides and front and back of the head.
Always inspect the helmet before putting it on and read the manufacturer’s instructions.
Caring for Helmets
Proper care and maintenance will prolong the life of the helmet. Helmets may be cleaned using a cloth and rubbing alcohol.
If you sweat a lot, it is best to wear a bandana. However, if the inside of the helmet requires washing, hand wash in lukewarm water using a mild detergent. Ensure that you protect the helmet from chemicals and any corrosive substances.
Avoid putting stickers on your helmet, as the solvents in the adhesive can damage the shell. Do not expose the helmet to excessive heat or cold.
Do not sit on or exert unnecessary pressure on the helmet. Do not use the helmet for any activities other than climbing.
Safety Inspection
Inspect your helmet before each use. Note the condition of the shell and foam liners. The foam should not be damaged or loose.
Look for any noticeable damage to the outer shell, such as significant dents. Check for any faulty buckles and hardware and any frayed or torn webbing.
Any helmet that is involved in a severe blow should be retired immediately, even if there is no visible damage.
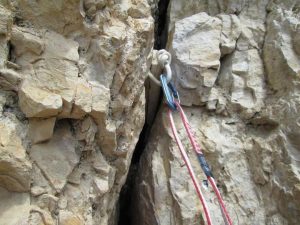
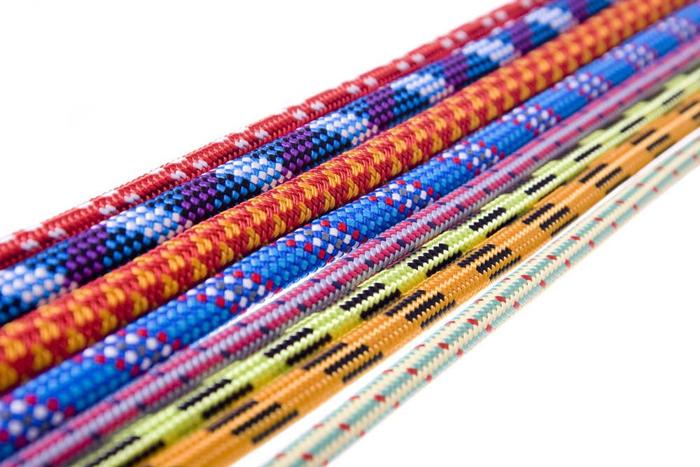
Climbing Rope
The climbing rope is considered your lifeline. The cable consists of a braided sheath and core and comes in various lengths, diameters, and types.
When selecting climbing ropes, you must consider type, features, diameter, length, and safety features.
Selecting Rope
There are two basic types of rope: dynamic and static.
The dynamic rope stretches to absorb the forces of a fall, lessening the impact on the climber.
Static ropes do not stretch, making them more durable than dynamic. Static ropes are used mostly for rappelling, gear hauling, caving, and rescue work. Static ropes should never be used to lead climb because they will not absorb impact in the event of a fall.
Dynamic rope is further broken down into three categories:
- Half
- Single
- Twin
Half – Half ropes are used for traditional mountaineering and ice climbing. A circled ½ symbol designates each end of the rope. Half ropes utilize two lines. One is clipped to protection on the left, and the other is clipped to protection on the right, allowing the rope to run straight and parallel. The half-rope technique reduces rope drag, but also requires expert skill and training, as it is more rope to manage.
Single – Single ropes are best used for top-roping, sport, traditional, and big wall climbing. A circled 1 symbol designates each end of the rope. Single lines are suitable for many types of climbing because they come in various lengths and diameters.
Twin – Twin ropes are best used for traditional climbing, mountaineering, and ice climbing. A circled infinity symbol designates each end of the rope. Similar to the half-rope system, twin ropes use two lines. The difference in this system is that both strands are clipped through the same protection. Although it causes more rope drag, this system allows for faster rappelling than a single rope.
A skinny rope is usually lighter but less durable when considering rope diameter. Thicker lines are more durable and abrasion-resistant. A thinner cable is preferable for hiking long distances to the crag, while a thicker rope is better for the local peak.
Here is an overview of climbing rope diameter:
Single up to 9.4mm – These ropes are lightweight but less durable and harder to handle. A thin line tends to move rapidly through a belay device, requiring an experienced belayer.
Single 9.5 to 9.9mm – This diameter range is ideal for all-around use. Single ropes in this range are light, durable, and easy to handle.
Single 10mm and above – This diameter range is best used for top-roping and gym climbing, as well as navigating sports routes and big wall climbing. They are thicker and more durable.
Half and twin – Half ropes range from 8 to 9mm, while twin ropes are 7 to 8mm thick.
Static – Static rope diameter ranges from 9 to 13mm. They are frequently measured in inches; therefore, it is not uncommon to see a 7/16″ diameter.
Choosing the correct rope length is imperative if you intend to climb outdoors. The dynamic rope ranges from 30m to 80m.
Generally, a 60m line is adequate in most situations. Be mindful that your rope must be long enough so half its length is greater than or equal to the route you intend to climb.
To illustrate, if your route is 30m long, you will need at least 60m of rope to ensure there is enough rope to climb up and be lowered.
The following are standard rope features to look for:
Middle mark – A middle mark is included on most ropes. It is a mark, typically black dye, to help identify the middle of the cable.
Bicolor – Bicolor means that the rope has a weave pattern that differentiates two halves of the cable. It is often an easier-to-spot and more permanent middle mark than the traditional black dye middle mark.
Dry treatment – Ropes that include a dry treatment reduce water absorption. This feature is best for traditional, mountaineering, and ice climbing.
Rope consideration can be a lot of information for the novice climbers. When in doubt, a dynamic rope is standard for outdoor climbing.
An ideal rope for a beginner is a 10mm dynamic rope. When in doubt, always seek the guidance of an expert when it comes to choosing rope.
Proper Use of Rope
Always use a rope bag that unfolds into a tarp, as it helps to protect your rope from dirt, dust, and damaging debris.
Do not ever step on the line, as this can grind dirt into the sheath and core of the rope.
Ensure that the cable runs free and does not run over sharp edges that can cause cuts.
It is good practice to keep a rope usage log that details the frequency of use, the number of significant falls, and the purchase date.
Keeping a record helps to establish when it is time to retire the rope.
Caring for Rope
Clean your rope when it gets markedly dirty. Rope wash is available at most retailers and allows you to wash the line in a machine, although a garden hose attachment works just as well.
The rope should be thoroughly dry before climbing on it. Cleaning the cable extends the lifespan by keeping dirt off the sheath and core.
Store coiled cables in a cool, dry location away from direct sunlight and gasoline- or petroleum-based products.
Safety Inspection
To fully know its condition, inspecting the climbing rope is vital before any climbing adventure. To check your rope, thoroughly run every inch of the line through your hands.
Look and feel for any damage that may include frays, fuzzy areas, and soft, mushy, or hard sections. Note any areas of discoloration due to sun or chemical exposure.
Any rope that has endured a long fall should be retired immediately, even if there are no visible signs of damage. Always purchase ropes that adhere to UIAA safety standards.
If you doubt the safety and reliability of the rope, retire it immediately.
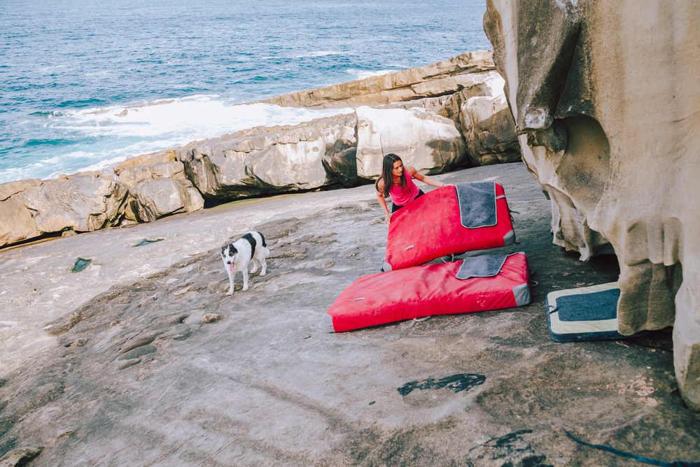
Crash Pads
Outdoor bouldering requires crash pads to prevent injury in a fall. Crash pads come in different designs, sizes, and thicknesses.
Consider these options when selecting a pad. Also, consider portability, as bouldering requires the climber to carry the pad to the bouldering location.
Selecting Crash Pads
Regarding the folding design, there are different types of crash pads, including taco, hinge, and baffled designs.
Here is an overview of folding styles:
Taco – The taco design is a continuous piece of padding that folds in two, like a taco. Most taco crash pads come with backpack straps for portability. Taco pads are useful for laying directly over terrain to create a landing area. There are no hinges or openings for rocks to poke through, but they do not tend to lay flat and are not easy to store.
Hinge – The hinge design has a uniform crease through the middle, creating two foam sections. Hinge-style pads often come with straps for portability. This type of design folds flat and is easier to store than the taco design. A drawback is that rocks can push through the hinged section, making them a poor choice for rough terrain.
Baffled – The baffled design consists of long tubes filled with foam and recycled material that are connected by partial hinges. Baffled crash pads lay flat on any terrain and fold securely but are denser than other pads. There is also the possibility of having more failure points due to having more hinges.
Crash pads come in two sizes: small and large, sometimes called medium and big or half and full.
The small pad is 3 feet by 4 feet, while the large pad is 4 feet by 5 feet. Small crash pads cover less landing area but are lighter and easier to transport and store. Big crash pads cover more landing area but are more cumbersome and awkward to transport and store.
Different manufacturers use different types of foam based on type, composition, and thickness. Foam options include open-cell, closed-cell, and memory foam.
Open-cell foam is soft and absorbent, and closed-cell foam is stiff and durable. Memory foam is described as either soft or hard.
The composition of the pad depends on the number of layers used. Generally, the thicker and stiffer foam pads can take significant falls and last longer but are too stiff for shorter falls. The thickness ranges from 3.5 to 5 inches for small and 4 to 5 inches for big pads.
Proper Use of Crash Pads
Crash pads must be placed thoughtfully to be effective. Consider the landing zone before climbing.
Decide on the fall trajectory and then put the pad in a fall zone, reducing the risk of injury. Crash pads can be used to cover boulders and fill holes between rocks.
Always have a spotter for safe climbing. While the climber ascends, the spotter can reposition the pads as necessary to reduce the risk of injury.
Caring for Crash Pads
To extend the life of your crash pad, take care to brush off any dirt after climbing. Do not store in direct sunlight or excessive heat, as this will damage the foam and outer material.
Avoid dragging the crash pad across harsh terrain; instead, pick it up as much as possible. Any holes in the outer cover should be fixed immediately to prevent foam damage.
Crash pads should not be stored while compressed or folded. Storing the pad in an open position will help to reduce wear and tear.
Safety Inspection
Inspect your crash pad before each use. Look for signs of excessive wear, holes in the outer cover, and discoloured areas from sun exposure.
There should be no loose or exposed foam. As always, if you have any doubt about the safety and reliability of the crash pad, retire it immediately.
Climbing Clothing
When choosing climbing clothing, consider factors such as the environment, temperature, and weather. Clothing for indoor climbing is mostly a personal preference.
In general, the clothes you choose should move with your body without being restrictive. Shorts are an option for many climbers, but expose your legs to scraps and bruises from the rock or wall surface.
If you are climbing outdoors, always consider what clothing you will require for cold and warm weather climbs, as well as rain.
Concluding Advice about Equipment
Choosing personal climbing equipment can feel both exciting and overwhelming.
As a rule, most retailers do not accept returned equipment, so it is vital to be patient and pick quality equipment that is right for you.
As a beginner, try many types of gear and ask many questions. Your safety is your sole responsibility when you are climbing, and it is your responsibility to ensure that you have reliable gear.