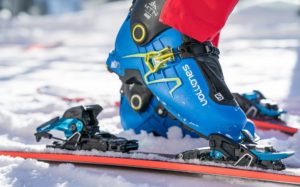
Backcountry skiing is growing, and the number of bindings available is mind-boggling. We researched the field, identifying 9 top performers and putting them in comparison. These alpine touring bindings, also known as AT or Randonee bindings, cover a spectrum of users, from those who only care about the weight on the up to those who need maximum performance on the down.
Comparison Table

Over hundreds of days and thousands of vertical feet, our experts weighed the benefits of each, analyzing how heavy they felt in the skin track and paying attention to their eccentricities in everyday use. In powder and on the sun-baked crust, we pushed each binding on the down, identifying any weaknesses. With this knowledge, we narrowed the wide selection available, so you’ll be able to select the binding for your ski needs and budget.
Best Overall Alpine Touring / AT Bindings for Backcountry Skiing: Dynafit Radical ST 2.0

- Durable and solid design
- Easy-engage heel risers
- Gold standard in tech binding design
- Fewer icing problems than other bindings
Our choice for the best overall touring product is the Dynafit Radical ST 2.0. A long-standing top choice for many, the Radical ST 2.0 is still the gold-standard in tech bindings, a benchmark for other models. The 2.0 maintains the efficient touring design of previous models, and several upgrades make the binding safer and more durable.
Some components of the Radical are known to break, so Dynafit has beefed these up, adding a pivoting toe piece and eliminated the 5 mm gap between the user’s boot and heel piece. With these changes, the Radical ST 2.0 now has ISO/DIN certification, offering a standard for safety and consistency in release values. These upgrades add 5 ounces per pair.
With several new strong contenders in this category, competition is stiff, but if we could only use one binding in the backcountry, the Radical ST 2.0 would be it.
Best Bang for the Buck: Dynafit Speed Turn 2.0

- Surprisingly durable for how light they are
- Killer price
- Lightest tech binding in our review
Top Pick Touring Binding for Primarily In-Bounds Use: Marker Duke EPF

- Fantastic durability and downhill performance
- Solid beefy design
- Easy to step into
- Difficult to transition and engage the heel
- Heavy
If you’re going to ski 70-100% of your time inbounds, whether skiing sidecountry or just ripping groomers, our Top Pick is the Marker Duke EPF. If you want the best AT binding for riding chairs and skiing gnarly lines, the Duke EPF has the positive boot-binding connection, ease of use, and durability you’ll need. The EPF is Marker’s Extended Power frame, which refers to the wider hole/mounting pattern, giving it better leverage on the ski. For pure touring, the Marker is heavy and is prone to icing up in the tracks that lock it down. Also, because of their locking mechanism, you always have to take your boot out of the binding to transfer between skinning and skiing, a disadvantage in our minds, though that wasn’t enough to overcome the Duke’s benefits for downhill performance.
Top Pick for the Ultimate Quiver of One: Marker Kingpin 13
- Great downhill performance
- Incredibly durable for such a lightweight binding
- ISO/DIN certified
- Heavy
- Not compatible with all tech boots
If you want only one pair of bindings for tour and resort, this is your guy. If you want to tour slightly more than half the time, we’d go with the Kingpin because it’s burly, you don’t have to modify your boot, you can tour flat-footed, and it is almost a pound lighter than the Freeride Pro. That said, there have been some problems with the Kingpin’s pins; if you are going to get into which binding is safer for in-bounds skiing, the Beast 16 has front toe pivots, allowing for a wider range of release directions (AKA more ways you can fall).
Best Tech Binding for Ease of Use: G3 ION

- Best tech toe design
- Easiest tech binding to step into
- Brake lock makes transitioning binding easier
- Looks cool
The new G3 ION 12 is rad looking and is one of the best contenders to Dynafit’s King of the tech binding touring throne. What we loved is the ION’s toe is super easy to step into; the easiest of any tech binding on the market. Instead of pressing down or hooking one side of the “pins”, the ION has two levers that engage the pins when bumped, so that no downward pressure is necessary. The heel, while super solid, had a handful of issues that kept it from being our Editors’ Choice. Every so often, the brakes would deploy without the boot releasing (AKA your brakes come down while you are still skiing). This was extremely rare but did happen on occasion. The heel on the ION was also more prone to icing up. When we left it outside during a wet overnight tour, we had to spend five minutes chipping the heel piece free to get it to engage. The heel risers also don’t always stay in place, nor do they engage as nicely as other models. None of these issues were deal breakers for us, and we still think the ION is sweet.

Best AT Bindings – Table of Content
Choosing the Best Ski Bindings for You
A Note on the Name: Alpine Touring vs AT vs Randonee
We use Alpine Touring, its shortened name AT, ski touring, and Randonee skiing all interchangeably as there is no true distinction between these terms. Randonee or in French with two n’s, Randonnée, is merely the French term used for ski touring that has more or less been accepted as the most universal term. Randonee or AT skiing is not tele-skiing (telemark). While tele-skiing, your heel remains free for the ascent and descent, whereas when you’re Randonee skiing, your heel is free for the ascent, but the heel is locked down for the descent, and traditional alpine turns are made.
Selecting the Right Product
When considering an AT binding, you first need to figure out where you are primarily going to use them. Are you going to tour elusively on them because you already own a downhill setup, or are you mostly planning on riding lifts and only going for the occasional tour? Or are you somewhere in-between? There is no “best” AT binding for every type of skiing. Consider the demands amongst the spectrum of skiing: from high-speed groomer laps and icy moguls to monster touring days with heaps of vertical and overnight tours. If you can, figure out approximately how much of the time you are going to be skiing in in-bounds on this setup (if any), compared to how much touring you expect to do.
Where are you planning on skiing?
If you are planning on getting a dedicated touring setup or planning on touring 50-60% or more of the time, we’d recommend most people get a “tech binding” because of their weight benefits and extremely efficient stride. If you are going to ski 50-60% or more of the time in-bounds, then we’d recommend a frame style AT binding because of their downhill performance and ease of use. If you are truly a user who is planning on skiing their setup close to 50% of the time, both in-bounds and touring, then read on for what might be the best for you.
Tech Versus Frame
Tech
Tech (or “pin bindings” in Europe) numbers have been growing as backcountry touring continues to gain popularity. Just over five years ago, Dynafit was the only name in town, but now there are more than a half dozen manufacturers with more tech bindings coming out every year. Tech bindings utilize “pins” that slot into metal lined holes near the toe of your boot and feature a heel piece that never leaves the ski. The primary advantage of these is weight, often being around half the weight of the average frame binding. Their other primary advantage is a more efficient pivot point, meaning you can stride more naturally while skinning, resulting in energy saved.
Adding to the efficiency of tech bindings is that you are not lifting the weight of the frame with every step because with tech bindings the binding stays on the ski. While lifting the frame part of the binding might not seem like a lot, add it up 5,000+ times and most folks will notice a difference. Tech style bindings are typically marginally harder to get into, especially in softer snow compared to their frame binding counterparts; they are durable but typically not quite as beefy as many framed modeled versions. But because of their weight and efficient stride, they are hands down the choice for backcountry users who tour on their setup more than 50% of the time. The primary disadvantage that comes from an overall reduced mass is that the bindings feel less damp on firm snow; an easy trade-off when you skin for hours to get to that firm snow, or a poor trade-off when you took a chairlift or a helicopter to get there. The final trade-off for most tech bindings is that you will need a boot with “tech fittings” and you will almost definitely not be able to use your downhill boots in them – meaning it’s harder to “ease” into the transition of purchasing a touring setup.
The G3 ION use “pins” that fit into metal lined holes in the front of the boot and in most cases the back of the boot. Tech bindings have a very solid connection and are more durable than people give them credit for, but they aren’t as tough as most frame style bindings. The Techs primary advantage is lighter weight and an efficient pivot point.
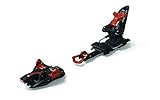
Frame
Frame bindings feature a metal structure (hence the term “frame”) connecting the toe and the heel piece of the binding that can be freed for touring and locked down for skiing. Frame bindings excel on the down and make for easy entry and exit. They are also arguably marginally safer. Examples that we reviewed are the Marker Duke, Baron, and Fritschi Freeride Pro. Frame style bindings look more like a traditional downhill binding but feature some sort of “release” that frees your heel to allow you to tour; this means that with every step, you are picking up a little extra weight because of the binding.
The pivot point, with the exception of the Fritschi Freeride Pro, is also typically not as efficient, and thus over the long haul will tire you marginally quicker, something that is even more noticeable on flatter approaches. In nearly every case, frame styles are heavier, often about 50% heavier, but sometimes even greater compared to their tech counterparts. Despite this, for primarily in-bounds focused skiers, these are the way. Their greater mass, while heavier for the way up, means superior dampness and performance on the down. The firmer the conditions and the greater the speed, the bigger to advantage to frame style. Most frame styles work with downhill boots and are easier to get in and out of. Their release is nearly always more adjustable in the toe and offers marginally better release at more potential falling angles. Are tech bindings dangerous? No, but do most frame style bindings release better? Yes. Frame bindings never force the users to lock out their toe, which nullifies or significantly increases the release value; in the event of the user being hit by an avalanche while skinning-up on the ascent, the skis will release. Overall, frame bindings offer slightly better releasability, meaning in strangely angled falls, you are potentially more likely to come out.
Blurring the Line
With all that said, not all tech nor frame bindings are created equal. While most tech designs are aimed to be lightweight and effective tourers; some, like the Marker Kingpin 13 and Dynafit Beast 16, are a little heavier, but offer superior downhill performance with their design. On the flip side of the spectrum, most frame bindings feature poor pivot points and force the user to step out of them at any transition. However, the Fritschi Freeride Pro offers hassle-free transitions and a solid touring efficiency, yet remains downhill boot compatible and are just as easy to step into.
If you are truly around a 50-50 skier, using a given ski setup half the time at the resorts, and half the time touring, consider that most tech bindings ski better than frame bindings tour. Meaning if you are close to the 50% mark, we’d lean you toward some sort of tech binding even if you are going to ski it in-bounds close to 50% of the time. Among frame bindings, the one exception to this is the Fritschi Freeride Pro.
Brakes
To start off, we would like to state an industry standard: that you should never use leashes while skiing with any type of avalanche hazard in avalanche terrain. Yes, partly because the skis might pull you down while you are being carried, but in reality, it’s primarily because your skis will likely beat you with sharp edges during the ride. Using leashes on firm slopes or on glaciers where you are primarily concerned with losing a ski is okay as long as you are extremely confident there is minimal avalanche danger. Ski resorts also require leashes when skiing in in-bounds areas.
As a whole, wer bindings with brakes; they feel that the added weight of brakes and an increased marginal amount of hassle was worth it for making it less likely to use a ski. There are many Randonee bindings that don’t come with brakes in order to save weight and a little bit of effort while transitioning; several models require the user to press the brake down while you spin the heel piece. We previously toured without brakes, but have since switched back over recently and find them worth it.
Just to present the other side the argument for not using brakes: if you’re skiing deep snow, you don’t need brakes because your skis won’t go anywhere. If it’s icy or you’re on a glacier, there is likely no avalanche danger and so you can use leashes. While we can agree to these points, we feel that there are too many days that just aren’t that cut and dry.
Binding Release Values and DIN/ISO/TUV Certifications
Alpine touring/Randonee bindings are not required to pass the ISO/DIN Certifications (ISO 9462:2014 to be exact) that all alpine/downhill bindings are required to pass. As a result, there are many touring bindings that don’t have this safety-oriented certification. While most frame style touring bindings like the Marker Duke and Fritschi Freeride Pro; feature the ISO/DIN certification, it was just in the last couple of years that tech-style bindings starting getting the certification. Among the first such tech-style bindings to receive this certification were the Fritschi Vipec, Marker Kingpin, and Dynafit Radical 2.0.
Someone has to create the certification and standardization for release values, boot sole thickness, and pin location; those someones are the German TUV (Technischer Überwachungsverein or in English: Technical Inspection Association) and DIN (Deutsches Institut für Normung) who both work with the ISO. The ISO is basically an international, independent, industrial standardization organization that defines standards on all manners of industry and technology (over 30,000 standards, to be precise) and they do the same for ski bindings.
They came out with standardization for touring bindings and just recently, another certification specifically for tech style bindings regarding boot binding interaction and release. This was, among other things, to help manufacturers design and produce a safer product, with more definable and consistent releasability.
This doesn’t mean that if your binding isn’t TUV/DIN/ISO certified that it’s necessarily dangerous, but we would argue that it’s likely not as safe as a binding that is. We also think to some extent the importance of this depends on the user; the more you want to ski in-bounds (AKA more volume and more chances of falling at higher speeds), the more important it is. Many of the tech bindings that don’t have TUV certification are on the lighter end of the spectrum and the manufacturer is prioritizing weight savings over consistent releasability.
There is no reason to lock your toes out while skiing 99% of the time. A pre-release is far better than a torn ACL or bleeding to death from having an appendage torn off in a small avalanche. By all means, if you’re skiing fall-you-die terrain, lock them out, but if your not, DON’T.
Tech Bindings: Don’t lock your toes 99% of the time!
While touring, most tech bindings toes are pulled up, eliminating any release value the binding might have. While touring up, this is essential, as it keeps your ski from falling off your boot at every kick turn. However on the descent, unless you are skiing true fall-you-die terrain (which most people rarely actually ski), don’t lock the toes up and eliminate your release. There are hundreds of cases of skiers needlessly blowing their knees, ACL, MCL etc., out while skiing mellow runs with their toes locked out. They thought they wouldn’t fall, but they hit an unseen object or just straight blew it, and there went their knee.
There have also been a few known fatalities including one skier whose leg was pulled partway off, destroying his femoral artery in an avalanche while skiing 35 degree powder with his toes locked out. His friends reached him in time, but he bled out from his injuries before help could arrive. If you happen to be skiing something that if you fall you are going to get extremely hurt and/or die on, by all means lock out your toes and risk your MCL, though most people ski with their toes locked out because they think it’s “cool” or because they see other skiers doing it and are simply unaware of the danger. There is no “one click” or “two clicks” for how much you are upping the release value; talk to the manufacturers: you will either release or you won’t and it has noting to do with the number of “clicks”.
How We Chose
Touring
For our touring comparison, we tested and compared the pivot point of each binding, its ease of entry and exit, and the binding’s resistance to icing up during wet or stormy days. We kept weight separate for this comparison category even though obviously lighter weight bindings generally mean superior touring; we kept these qualities separate for our scoring purposes.
Tour performance is obviously the single most important factor when considering AT bindings. While everyone wants something that performs on the down the truth is most of the overall time spent while touring is on the way up. For this category, we took into account, pivot point, heel riser options, overall efficiency, and icing issues when scoring.
Pivot Point
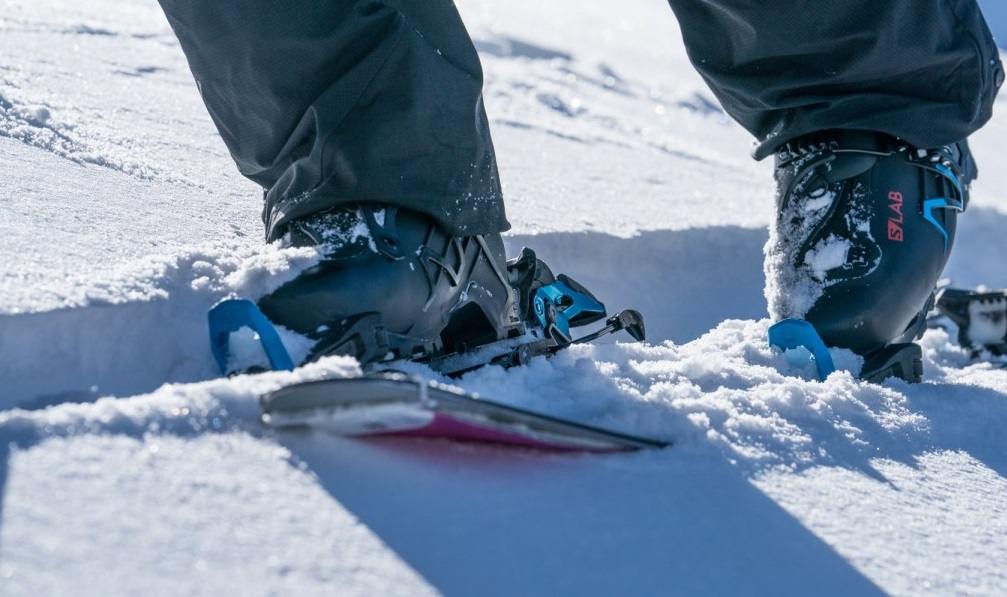
The pivot point of the binding is key for efficiency because it allows you a more natural stride. Bindings like the Marker Baron 13 EPF or Marker Duke have a pivot point that is slightly out in front of the toe of the boot, forcing the user to have a slight “tip-toe” effect. Whereas all tech and some frame bindings, like the Fritschi Freeride Pro, have a pivot point that is slightly further back and more under your toes, that provides a much more optimal and efficient stride, saving you energy and reducing fatigue on your leg muscles.
Resistance to Icing
We compared how each contender resisted to icing. Luckily, we tested most of these products in the Pacific Northwest, where this was easy to do. All bindings ice up to some extent and need to be chipped free. However, the Marker Duke, along with the Marker Baron, are by far the worst as far as icing is concerned. Ice would get into the tracks making transitioning into a downhill mode during stormy close-to-freezing-days, a huge pain at times. We recommend folks who use this binding to bring a 3 mm plastic scraper to help clear out the tracks.
How resistant they are to icing up should be a factor you consider when purchasing Randonee bindings. There is a large difference between the best most resistant products and the ones you need to bring an extra 3mm scraper for while touring on any warmer storm day.
We found that resistance to icing was one of many reasons we liked the Dynafit Radical ST 2.0 so much because it never got so frozen that we couldn’t quickly free it. We also really appreciated how easy it was to clear ice from underneath the toe section of the G3 ION 12 with a large gap below the toe that a pole tip could easily assist in clearing ice. On rare occasions the ION’s brake holder also would ice up, leading to brake deployment while skinning (a slightly funny sight), or not deploying at all while in ski mode. This was rare, but we experienced this during wetter days. The Marker Kingpin also features a sweet space underneath the toe piece that we could use a pole to clear away ice, though its downhill style hole rarely iced. Its leaver occasionally did, but we never thought it was much more difficult to clear.
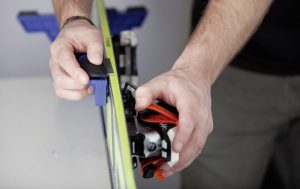
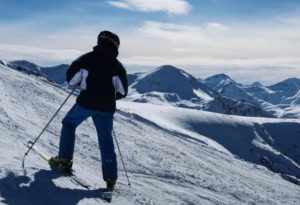
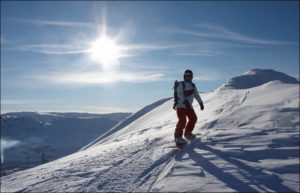
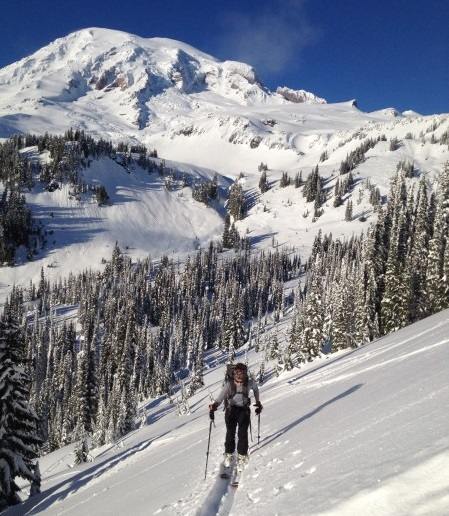
While backcountry touring you expend a ton of effort going uphill and the last thing we feel most users want to do is waste effort trying to get into bindings. We compared how easy each one was to get into and out of through a series of side-by-side tests. Here Ian Nicholson skins up the Boston Glacier on the Forbidden Tour, North Cascades WA.
The Marker Kingpin was likely the next easiest of the tech bindings to get into, similar to the Dynafit it features two “posts” that help line your boot up correctly. The only reason the new Dynafit Radical ST 2.0 were slightly more challenging was because of the pivoting toe piece that rotates up to 5 mm on either side. Take a quick backwards glance to make sure the user’s heal is properly lined up, or briefly lock your toe out (which locks out the pivot of the toe and forces your heel to come down in the correct spot) before releasing for the descent.
The Fritschi Vipec, while offering plenty of other advantages, took the longest to get the hang of. Like the Radical ST 2, there are tricks to making this process easier with the Vipec (like using the heel piece to help get the distance of your boot just right), but they do unanimously take the most body coordination and time to get into in a timely manner.
Frame bindings, in general, are much easier to step into than tech bindings, a difference that is even more obvious in softer snow. All the frame models we tested are easier to get into than the techs. Among frame bindings an interesting note is: lighter weight skiers sometimes have a hard time getting the heel of the Duke to clamp down. We noticed this on several of their products with lighter skiers (less than 150 lbs), but particularly the Duke. This was such a problem that we would advise most lighter weight skiers to avoid buying it and instead get the less beefy model.
Where it Matters
For all of their advantages the frame style Marker bindings; the Duke and Baron, are by far the biggest pain to transition with, because no matter what, you have to take your boot out of the binding in order to transition and can be challenging to flip.
The Fritschi Vipec snapped between walk and tour mode very easily whether below our feet or in our hands. The Radical ST 2.0 transitions well, but if you don’t take your skis off while transitioning for the descent, it is difficult to use a pole, and you then have to bend over. We really like the small feature found in the bindings, which consisted of the brake staying deployed until our boot became clipped into the ski, minimizing the chance of it running down the hill without us. If your someone who never attempts to rip skins with your skis on your feet, the Marker Kingpin’s transition is very smooth and is easy to do, but is extremely difficult with skis still on your feet.
Heel Risers
We also compared how easily each heel risers engaged and disengaged. All the products we tested have two levels of heel risers on top of a flat touring mode (with the exception of the Beast 16, which has no completely flat touring mode, just a close-to-flat mode). The Dynafit Radical ST, Fritschi Vipec, and the Marker Kingpin had by far the easiest to engage and disengage risers; the Fritschi Freeride pro was decent, though the Marker Duke and Baron were the most difficult, taking the most precision and effort. The G3 ION’s heel risers were okay, but weren’t spring loaded, and didn’t “snap” into place as easily as the other tech bindings we tested.
A Note on Using Heel Risers
Heel risers are an excellent tool designed to save energy and minimize strain on your calves, quads, and hip flexors when used properly in the correct terrain. If you are using your heel risers while ascending terrain or a skin track that isn’t steep enough, it will actually tire your legs out more quickly than if you otherwise weren’t. How do you know if you should or shouldn’t be using your heel risers? If your legs don’t straighten out all the way, then you shouldn’t be using them. When your leg doesn’t straighten all the way out, that means it doesn’t get that moment of recovery while your body weight is briefly being held up by your skeleton, nor does it let you use your entire leg muscle, instead of concentrating the workload on a single part of it. That means using your highest lifters on only the steepest skin tracks or while breaking trail in deep snow (it helps keep your ski tips on the surface) even for the lower set; if you’re feeling tired, switching them up feels good in the short term, even if it’s not too steep, but after a few minutes it will tire you out much more quickly.
Weight
Bindings can be pretty light; while not reviewed here, our favorite super lightweight touring binding for its weight (still featuring Adjustable DIN 7-12 releasability) is the Dynafit TLT Superlite, checking in a ridiculous 350g/12 oz!!!
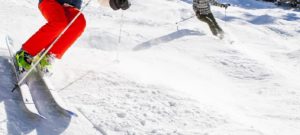
Downhill Performance
For our downhill performance, we compared how well each AT binding performed on the down. While most felt great in softer snow, we made sure to compare them in harsh, icy, and variable snow and at higher speeds where we could feel more of a difference. There are several factors contributing to downhill performance that include, but aren’t limited to the bindings mass, the overall rigidity of the design, amount of elasticity of a binding, its stack height, the ramp angle/delta angle, and mounting pattern.
AT bindings that have a more positive connection as well as more surface area (touching both between the boot and the binding) within the binding itself, and between the binding and the ski, generally perform better. The Marker Duke and Marker Baron’s sliding tracks might be a pain to transition with, but also help the binding keep the best connection among frame style bindings; this was one of the major factors as to why we chose the Duke our best pick. We felt the Marker Duke and Baron had less “play” within the binding when compared to the other frame style models that we tested (like the Fritschi Freeride Pro).
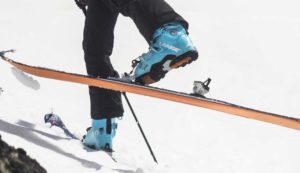
Overall mass and boot-binding connection play the biggest role in downhill performance. While ramp angle, mounting patterns, and stack height play a role in performance we felt it was much less. Testing on a stellar corn day near Mt. Rainier WA.
Among tech bindings, the Dynafit Beast 16 and the Marker Kingpin 13 were our Top Pick for downhill performance, given their incredible positive connection. What’s particularly impressive is that the Marker Kingpin achieved as good of a downhill performance as the Beast 16, at almost a pound less weight. Among the slightly lighter tech bindings, we thought the Vipec’s and Dynafit Radical ST 2.0 notched marginally better downhill performance when compared to the older Dynafit Radical ST and G3 ION.
Mounting Pattern
The mounting pattern, specifically how wide the bindings mounting pattern is, has some effect on how well it performs. While it might not be as much as some companies make it out to be, it remains a factor in power/energy transmission. How much impact depends on how wide your skis are. Bindings with a wider mounting pattern get more leverage, while this matters less for narrower skis as it becomes marginally more noticeable as skis get wider. When you consider wider skis on relatively firm snow (instead of softer snow), the bigger the difference the mounting pattern will make. The Marker Baron and Marker Duke have the widest mounting pattern in our review, just another factor adding to their impressive downhill performance. The Fritschi Freeride Pro also features one of the wider mounting patterns in our review.
Stack height basically refers to how far your boot is above the ski, while a handful of folks like more stack height as a whole most binding manufacturers compete to see who can have the least because most backcountry skiers prefer to be closer to the ski.
Stack Height
Stack height is how far your boot is off the ski. While some ski racers like more stack height, most skiers, especially backcountry tourers, prefer to be closer to the ski. This gives the user a better balance and “feel”. Generally speaking, most manufacturers compete to see who can get the lowest stack height possible. Tech style bindings have an easier time (when compared to most frame styles) getting lower stack height basically because they don’t have to put as much “stuff” between the boot and the ski.
Ramp angle or delta angle is a factor that a lot of people like to talk about and while we agree it is a factor, you should base your touring decision making with delta angle as a primary factor. For those who just can’t stand it, we found the Marker bindings, G3 ION, and the Dynafit Beast to have the lowest delta angle.
Ramp Angle and Delta
Ramp angle is basically the difference in height between the toe and the heel on the binding. Your exact ramp angle will change slightly depending on the size of your boot and its BSL (Boot Sole Length) over the distance between the heel and the toe, though the number you see is typically a measurement of the difference that is often referred to as the Delta angle (because it doesn’t change with boot size). AT bindings tend to feature a higher ramp angle than most downhill bindings to help make up for generally softer, less aggressive and forward-leaning boots. Models like the Radical ST 2.0 have a ramp delta of +15 mm, the G3 ION +13 mm, and the Beast 16 or the Marker Duke/Baron/Tour, which all have +6 mm. That we are aware of, the biggest difference between the toe and the heel (among AT bindings) is the Plum Guide (not reviewed here), which sits at +17 mm.
Compare that to popular traditional alpine bindings, like models from Atomic + 2 mm, Marker Jester & Griffon + 4mm, Look +3 mm, Salomon +2 mm and Head +3 mm. Among all of the factors to take into account regarding downhill performance, we think ramp delta is the least important, but it’s an often talked about (sometimes over talked about) factor.
Overall durability is tough to determine, we talked to as many folks as we could, several backcountry shops and a handful of sales reps to help figure out where all AT bindings stood. What we do know is that you don’t want to be several ridges back and have them catastrophically break.
Durability
The most durable product that we tested was the Marker Duke, with the Marker Baron trailing closely behind. Marker sells a lot of these models and it’s surprising how few problems they see. Dynafits, despite their minimal appearance, are surprisingly tough. They are designed in a way that the plastic pieces are designed to break before the more crucial metal pieces, so that if you’re deep in the backcountry it remains functional, albeit harder to use.
Even when going on long, super remote tours, we’d still reach for the tried-and-true design of the Dynafit Radical ST 2.0, which has proven its durability and has relatively few problems for the number out there; we don’t totally think the same about the Beast 16, despite its ability to stop big airs and we wouldn’t love to take it on a 10-day alpine traverse. Besides TYV certification and increased binding elasticity, we think the biggest design differences are the subtle designs that vastly improve strength and durability, with the Dynafit Radical ST 2.0 having its few weak points beefed up (the most notably the top of the heal spindle).
Both the Vipec and the Kingpin had few fairly major issues with the glue holding the front pins in position, though both companies seem to have dealt with that issue. While the Fritschi Freeride Pro is burly and tough enough for most resort riders, it isn’t quite as durable as a Marker Duke; however, when compared to the Duke, it offers significant weight savings and a more efficient pivot point.