Even though paddling in groups is one of the rules of kayaking, it is crucial for a kayaker to be able to self-rescue in their kayak. The Paddle Float is a piece of gear that was designed for the very purpose of aiding a kayaker back into their kayak unassisted. This how-to will guide you in properly using self-rescueing in a kayak while using a paddle float.
Difficulty: Hard
Time Required: 30 minutes
Here’s How:
1. Perform Wet Exit
Of course, before you can get back into your kayak you must first be fully out of it. Their is a proper and safe way to “wet-exit” you kayak and you should practice this step in protected waters with another person spotting you.
2. Flip the Kayak Over and Grab the Paddle Float
Before you can use a paddle float to get back into your kayak you must first flip the kayak back over. Reach over the upside-down kayak and roll the boat to you. In the process much of the water should drain out of the kayak, however, there will still be a good amount still in the kayak. Don’t worry about that for now. At this point, you should acquire the paddle float which is hopefully under a bungee cord on the deck of the kayak.
3. Put a Foot in the Kayak
At this point, you want to make sure that you don’t get separated from the kayak while setting up the paddle float. To do this, lay back in the water with your head toward the stern of the kayak. Place your leg into the kayak, thereby keeping you attached to it.
4. Slide the Paddle Float over the Paddle Blade
Orient the paddle float properly over the outside kayak paddle blade. You should practice this step out of the water to see how the float goes over the paddle as some of these devices have a top and a bottom. Be sure the paddle float is secured to the paddle blade, not just slid over it. This is often done with a buckle and strap that wraps around the shaft of the paddle.
5. Blow up the Paddle Float
While your leg is still inside of the kayak and with the paddle float secured to the paddle, blow up the paddle float. Again, this is a step that should be practiced prior to getting in the water so you can understand and get practice with using the valve.
6. Position the Paddle Across the Boat
You can remove your leg from the kayak and move to just behind the seat. Place the paddle blade without the float on it across the back deck of the kayak up against the cockpit combing. The paddle float should be in the water with the paddle shaft at about a 75-90 degree angle to the kayak.
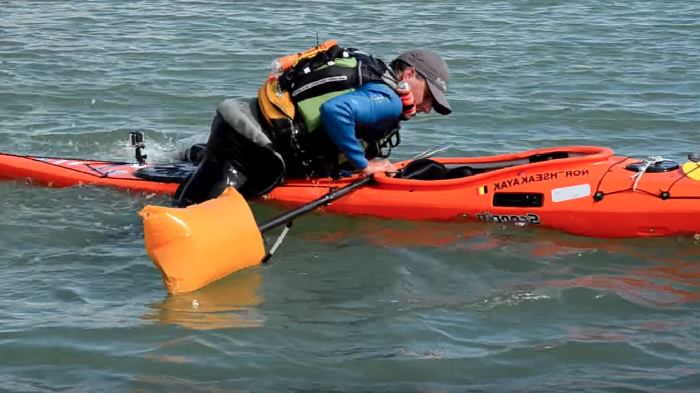
7. Pull body up over the Stern of Kayak
Get behind the paddle, maintaining its position over the deck of the kayak. Hoist your chest as high up on the stern of the kayak just behind the cockpit. Hold this position until you are stable.
8. Position Feet on the Paddle
Put one on the paddle shaft just above the paddle float. Then put the next foot on the paddle shaft next to the first foot. You may have to pull your body further up on the kayak to do this. At the conclusion of this step, you will be face down with your up on the back deck of the kayak and your feet on top of the paddle shaft.
9. Place Closest Leg Into the Kayak
From this leveraged position, place your closest leg to the kayak inside of the kayak. You can do this by moving your knee over the kayak first and then once in contact with the boat lift the foot off of the paddle and then into the kayak.
10. Roll Body up Onto Kayak
You’re almost there! Now, slide or roll your whole body, save that one foot on the paddle, onto the kayak. You should still be facing downward, laying on the kayak, with your head toward the stern.
11. Place Other Leg Into the Kayak
There isn’t much more to this step than placing your other leg into the kayak.
12. Roll Over Into the Kayak
Since you will be laying face down on your boat with your legs in you kayak you will need to roll over while putting your feet into the correct sides of the kayak bulkhead. Depending on the size of your kayak, this step could be easy or it could be difficult. Be sure to hold onto your paddle through this step
13. Bilge Out the Kayak
Be sure that you are seated in a stable position. Keep the paddle float in the water to help stabilize the kayak. The kayak will be unstable because there is still water in it. Acquire your bilge pump which is hopfully attached to the deck of your kayak and bilge out the water while maintaining pressure on the paddle float for stability.
Tips
- Practice securing the paddle float to your kayak paddle and inflating it while on dry land so that you understand how it works.
- Keep your bilge pump and your paddle float secured to the top deck of your kayak.
- When practicing how to self-rescue using a paddle float, remove all other loose items from inside the kayak or from the deck of the kayak so that you don’t lose anything.
- When practicing, have a spotter in the water with you to come to your aid if needed.
- Always practice in a protected body of water and close to the shore.