If your kayak has a crack you’ll be hard-pressed to find someone to repair it for you. An online search will reveal that you could potentially plastic weld it providing you have a plastic welder, a heat gun, and some HDPE plastic welding rods. Most times however it can be a daunting thought and you might not want to spend the money on such specialized equipment. Here’s a way for you to plastic weld your kayak without buying a single thing.
While it might not look professional, this method will get the job done and save you from having to scrap your perfectly good yet slightly damaged kayak.
Plastic Welding Materials
If you’ve ever looked up how to plastic weld a kayak, you’ve probably come across a list of equipment you’ll need such as a heat gun, a plastic welder, and plastic welding rods. Most times however it can be a daunting thought and you might not want to spend the money on such specialized equipment. There is a way for you to plastic weld and repair your kayak without buying a single thing. While it might not look professional, this method will get the job done and save you from having to scrap your perfectly good yet slightly damaged kayak.
Here are the supplies you’ll need to plastic weld your kayak on a budget.
1) Hair Dryer
The main component to plastic welding is heat. In plastic welding, you’ll want to heat the surface of the hull at the location of the crack. Most directions usually tell you to use a heat gun. However, most hair dryers can produce enough heat to get the job done, given enough time.
2) Lighter
You’ll need to melt the plastic parts that are going to get welded together. In most cases, a proper plastic welder, which functions sort of like a glue gun, is what is used. However, any open flame will melt the plastic. Torch lighters are the best bet since you can aim the flame, but regular flame lighters will do the trick also.
3) HDPE Plastic
This at first will seem like the trickiest supply to get. However, it really isn’t that bad. The best material to use is the exact linear HDPE that the plastic kayak is being repaired. There are a few ways to get this. You could contact the manufacturer to see if they’ll send you some scraps from their kayak production.
Another option is to trim some material from an area such as the kayak cockpit combing. This probably isn’t appealing to most kayak owners. If you’ve made any modifications to your kayak, such as installing a kayak hatch you can use the plastic cutout.
If those three options don’t work for you, there is another more creative way to get the necessary plastic for your plastic weld. Many consumer products’ packaging is made of linear HDPE. So, milk jugs, detergent bottles, and butter tubs are all the right materials. The recycling symbol that goes along with HDPE is the number 2. Whatever you choose to use be sure to clean it up and rinse it off.
4) Drill and Small Drill Bit
A dril is used to stop the propagation of the crack at the ends.
5) Screw Driver or Spoon
A smooth metal tool with a flat edge will be used to help blend and mash the melted plastic material together.
6) Paper Towels or Rags
You’ll want some basic cleaning supplies to prepare the areas that are to be welded together.
That’s about it. Before plastic welding your kayak, it’s a good idea to practice melting and welding scrap pieces of plastic to get used to the process. If you don’t want to waste the material you’ll be using, get a scrap milk jug or detergent bottle and practice on that.
Steps to Cheaply Plastic Weld Your Kayak
1. Determine if You Can Plastic Weld Your Kayak
The first thing you’ll have to do is make sure that your kayak is the right material for plastic welding. Only Linear High-Density Polyethylene can be plastic welded. While most boats are made of this type of HDPE, some are made from Cross-linked HDPE which cannot be welded.
2. Gather Together the Needed Plastic Welding Supplies
While there are heat guns, plastic welders, and HDPE welding rods, this method uses common household items to plastic weld your kayak. The most complicated supply in the above list is to gather the scrap plastic you’ll use for the weld.
3. Practice
Take scraps of HDPE, either from the extra material you will use or from a milk jug or detergent bottle, and practice melting and welding the scraps together.
Get used to melting, not burning the material.
4. Clean the Crack in Your Plastic Kayak
Before you start to plastic weld your kayak crack, you’ll want to set up your workspace and clean the crack and surrounding areas with alcohol and a paper towel. The truth is, water and rag would probably be fine also.
5. Stop the Crack from Spreading
This is usually one of the scarier steps since it involves doing something no paddler is comfortable doing, namely putting a hole in their boat. However, it really is no big deal. You’ll want to use a small drill bit. Drill a small hole at each end of the crack to stop the crack from spreading.
6. Heat the Boat
Use a hair dryer to heat up the area on the kayak to be plastic welded. This is mainly for preparing the surface. Be careful not to melt the hull. So, start with the hair dryer further away and gradually bring it closer to the hull.
7. Melt the Plastic
With the hull heated up, begin heating and melting the plastic scraps for the weld. This is the tricky part. Melt the plastic without it burning or catching on fire. This is done by placing a flame close to the plastic without touching it. Wave it back and forth to uniformly heat it up. This is best practiced beforehand as in step 3 above. As the material begins to melt it will become transparent and almost clear and glossy. Apply a last bit of heat to the hull of the boat.
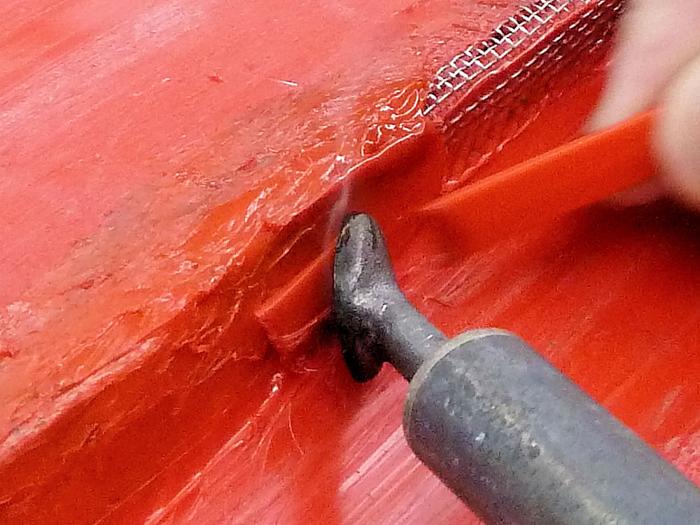
8. Work the Plastic into the Boat
Drip the melted plastic into the crack if possible. If it doesn’t want to flow that easily, it may need to be heated more. The melted plastic can also be pressed into the crack. It is important that the new plastic fills in the crack. If the crack isn’t wide enough for this to happen, a very thin drill bit can be used along the inside of the crack to make it wider. This will allow the plastic to flow into it and fill the crack. Using the screwdriver or other metal edge press and work the plastic into and over the areas surrounding the repair.
9. Smooth Out the Work
Once you are comfortable that the repair is sealed and leakproof, you’ll want to clean up and even reinforce the area. A layer of plastic can be added over the repair, providing it is properly heated and melted. Then heat the final repair up with a hair dryer or by waving a flame. Then, take the spoon or metal implements and smooth the area out, especially the edges.
10. Trim Any Excess Plastic
Finish the job by trimming any loose or edges of the plastic with a razor blade.