Every kayaker should know how to get back into their kayak in the event that they become separated from their boat. The T-Rescue is one of the easiest methods for doing so, providing the kayaker is not paddling alone. The following steps should be practiced by two or more kayakers in shallow water prior to going out on any kind of unprotected water kayaking trip.
What is The T Rescue?
Those who take a comprehensive sit-in-side kayak course will be introduced to a variety of self-rescue and group-rescue techniques to deal with capsized kayaks in a quick and efficient way. Those of us who paddle sit-on-top kayaks may not have been trained in such practices, and more likely not using a sit-on-top in the lesson at all. In fact, sit-on kayakers may be blissfully unaware of the skills and necessity of sit-in rescue methods.
The method is called the “T-Rescue” and is virtually identical to the sit-in version. This form of assisted rescue is fast and easy. It is best used to rescue a touring type kayak – with bulkheads, or properly fitted and secured float bags.
It is harder to perform on recreational (short) sit-in kayaks, that rarely have bulkheads or even floatation bags. For this reason, I cannot stress more the need for bulkheads or proper float bags in any type of sit-in-side kayak. Ask your sit-in buddies if they have them, and encourage them to get them if necessary.
Mixed Fleets
Sit-in-side kayakers tend to keep close while paddling to enable them to quickly come to the aid of a group member. Sit-on-top paddlers often do not keep as close. So when paddling in mixed fleets try to keep a short distance, not too close, to the other boaters. It is not uncommon for any type of kayaker to tip over and, in the case of sit-ins, fail to roll. The reasons for a capsize are many and no one, regardless of experience, is completely immune.
Outfitting Your Kayak
You will want your sit-on-top kayak outfitted with Knee Straps (aka thigh straps or thigh braces) to best perform this rescue. It can be done, if necessary, without them, but the better you “fit” into your cockpit with well-adjusted foot supports, backrest, and knee straps the more control you will have and the better the results. This rescue is easy and successful with knee straps, but considerably more difficult without them.
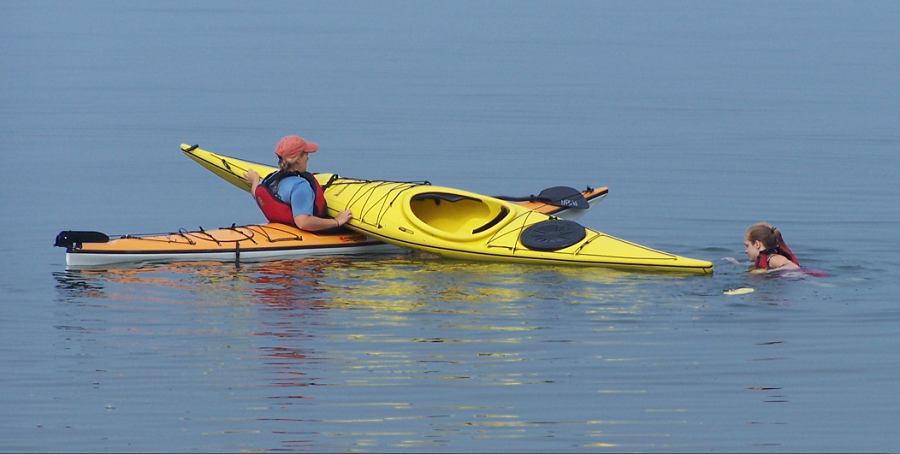
The end result of most tip-overs is an upside-down kayak and swimmer, sometimes with floating (or sinking!) bits of gear drifting around. In the case of a sit-in-side kayak, the boat will be partly to mostly swamped. The water may be cold, even dangerously cold, and the swimmer may be quite shaken. (I would hope they are wearing a PFD.)
So how do you rescue someone in a Kayak?
Performing an Assisted T Rescue
1. Rescue Response
When you respond to such an event there is a process that should be followed to ensure the safety of the swimmer and the efficiency of the operation. As soon as you observe the capsized kayak you will want to paddle toward it. You need to communicate with the swimmer to determine their state of mind and personal safety.
As you approach ask in a loud, calm voice “Are you OK?” In doing so you are seeking the following information; Is the paddler hurt? Is the paddler cold? Is the paddler afraid? You may need to ask each of these questions directly, as many folks will want to “keep a stiff upper lip” and respond “I am fine” when they are not. Fortunately, most paddlers will be fine.
If the paddler is cold, which is quite likely, this means you will have to act fast. If the paddler is afraid then you will want to present a calm face to them and assure them that you will have them back in the boat quickly. Approach a scared swimmer carefully, they may want to climb onto your kayak or grab your paddle, making you swimmer #2. Instruct a scared paddler to “Hold onto your paddle and get to the stern of your kayak. I need you there for this to work.” If the paddler is injured, not very common in open water, then you will have a difficult rescue, may need help from additional paddlers, and use a different variation on the T-Rescue.
At the early stages of the rescue, you may have several would-be rescuers all approach. Some short communication with them will be necessary. Hopefully, you know your comrades well enough to know who is most able to assist, but if there is an amount of time needed for a “group leader” to arrive on the scene it would be better to have the closest person with skill to handle rescue. Those who are in the vicinity, or without skill, can pick up the gear that may be floating away.
See to the swimmer’s safety first, their boat and paddle second, and anything else AFTER the swimmer has obtained help.
Once again as you approach ask the swimmer “Are you OK?” and tell them that you will get them back in their kayak. Keep the “conversation short” but you will also need to provide instructions along the way.
2. Shouting Instructions
Instruct them to “Hold onto your paddle.” Many will let it go, as it is somewhat useless to a swimmer, and few sit-in paddlers use a leash.
You will need their kayak to remain upside-down for the T-Rescue. Some swimmers will want to turn over their boat in an effort to recover; this will only scoop more water into the hull. Instruct them to “Keep your kayak upside-down.” A sit-in kayak that is upside-down will float remarkably high, particularly if it has bulkheads or float bags. Not only will this better support a swimmer waiting for rescue, but also it will make the rescue go easy.
If the kayak has been turned over right side up you will simply have to turn it back upside down when you get to it.
The swimmer needs to be located at the stern of their kayak for this rescue to go well. You will want their help in “lifting” the kayak. Instruct them to “Go to the stern of your kayak.”
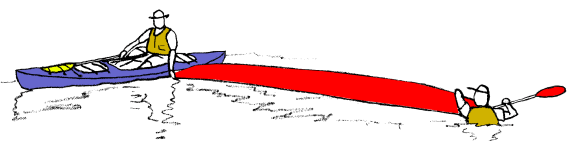
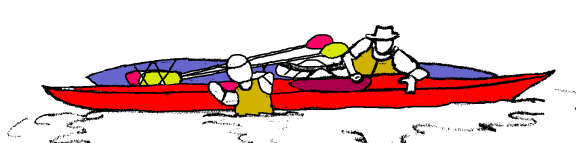
You will need to paddle to the bow of the swamped kayak. Do so that your kayak makes the top/across of the letter T, and the swamped kayak makes the base/upright of the letter T, hence the “T-Rescue.” It is very important for the kayaks to be in this T pattern for the rescue to work. So approach the swamped kayak with this in mind.
Sit-In Kayak Design Considerations
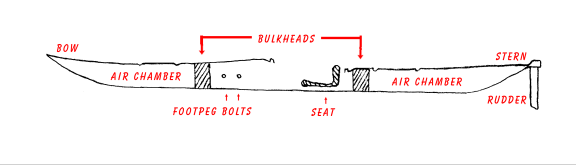
You may be wondering, “Does it make a difference, bow or stern?” Yes, it really does! Assuming that the kayak is outfitted with bulkheads or floatation bags the water will flow out of the kayak almost completely if lifted by the bow. The seat is in the center of the kayak. In front of the seat, under the deck, is the space for the paddler’s legs. Behind the seat will be the stern bulkhead or airbag. In front of the foot space in the cockpit will be the bow bulkhead or the smaller airbag.
Also of note; the cockpit opening is centered, while the space below is off-center to accommodate the legs. What this means is that there will be more water in the bow of the kayak than in the stern. Also, the position of the seat, cockpit opening, and stern bulkhead or bag will channel the water out of the kayak when lifted from the bow in an upside-down orientation.
Look for the rudder (stern) or maybe the bolts for the foot braces (bow) along the sides to help determine bow from the stern.
3. Draining The Kayak
Once you are in the T position, more or less – you at the bow, the swimmer at the stern – secure your paddle in deck rigging. A Deck Net, hatch straps, Bowline, perimeter grab-lines, or Paddle Leash can be used, but you must be able to stow the paddle quickly. The Deck Net is the best in my opinion. The paddle must be secure so it will not drift away. Stow the paddle so it is on the opposite side of your body as the swamped kayak is. In some cases, you may be handed the swimmer’s paddle or just happen to pick it up. Stow them together in the same fashion as applicable.
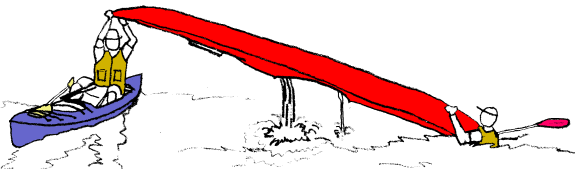
Now you have your hands free. Grasp the bow of the swamped kayak. You can correct the angle of your kayaks, to make a 90-degree T formation, quite easily using your arms and hands on the swamped kayak and your legs and hips on your kayak in a torso twisting motion. Note: this drawing shows elbows over shoulders in lifting the kayak which is not good form. You don’t have to lift the kayak that high.
4. Getting The Paddler Back In
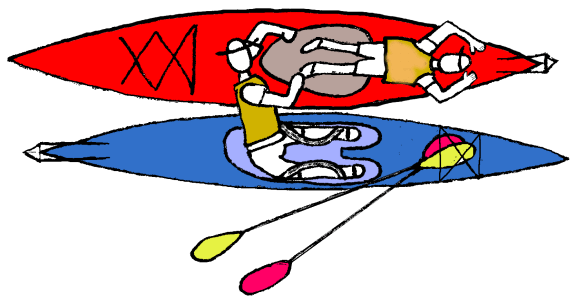
When the newly floating kayak is lowered back into the water maintain your grip on it. Pull the kayaks together side-by-side. Your bow MUST be along the stern of the swimmer’s kayak and vice-versa, so the kayaks are pointed in opposite directions. Grab onto the cockpit coaming with one hand.
Now you start to get the swimmer back into the kayak. Instruct them to “Swim to me. Hand me your paddle.” You can reach with the other hand, even pulling them to you as you get their paddle. Tell them to “Hold onto your kayak” while you stow their paddle with your previously stowed paddle.
When you have stowed the paddle securely reach over the kayak, across the deck in front of the cockpit opening, with the arm closest to the swimmer’s boat, and “hug” it. Grasp the cockpit coaming, closest to you, with your far arm on the side away from the swimmer’s kayak. A good firm grip of the swimmer’s kayak is mandatory on your part. Do not lose it. In rough conditions, you may need to grip the cockpit coaming with both hands near the thigh braces. (Sit-in thigh braces are like kneepads inside the cockpit.) In this placement, you will have a commanding view of the swimmers’ re-entry.
Gripping your kayak snuggly with your Knee Straps, allow it to tilt a bit as you shift most of your weight over onto the swimmer’s kayak. In fact, you can recline your torso on the swimmer’s kayak deck. This makes your kayak an “outrigger” to stabilize the swimmer’s kayak. Your body is the amma or crossbar.
At this point, the swimmer can now re-board the boat. Instruct them to “Climb onto the back deck, face down.” They will clamor up on their kayak much as you would during a SOT deep-water re-entry, with their belly on the deck.
When they are across the back deck instruct them thus: “Head faces to the stern, feet to the bow.” This orients them to get their feet into the cockpit first. Add: “Keep Low! Kiss the deck.” Once on board the rescuee will tend to want to sit upright or otherwise bring themselves higher above the water. This will raise the center of gravity and make things tippy, they even may fall off! It is very important for them to stay low, even keep their head low so their nose should actually be pressing against the deck.
Next, tell your rescuee to “Put your feet into the cockpit and slide to the bow.” You may have to help them put their feet into the opening, but be careful not to lose your grip, both of you will end up in the drink! The motion needed from the rescuee to slide into the bow is a kind of inchworm-like movement. In fact, you may use the word “inchworm” as you direct the rescuee.
This is to some degree an awkward motion and can take a bit of time. You can help only by voice, as your grip on their kayak is the only thing keeping you both on top. They can push up with their arms and hips only enough to keep them moving to the bow and into the cockpit. You will likely have to remind them to “keep your head down & stay low” as they go. They will want to lift their head up to see where they are going, so be their eyes and tell them where they are.
When the rescuee’s hips have passed the rear of the coaming and are over the seat instruct them to “Turn over facing me.” As they roll over their butt should slide into the seat. It is important for the rescuee to turn toward the rescuer. This keeps the weight shifted in a manner that can be handled by the rescuer.
5. On Their Way
Maintain your grip on the kayak. The show is not over yet! You have the rescuee back in the seat, but there may still be water in the hull. The sit-in-side kayaker should have a bilge pump. If they do not they are unprepared and this should be a wake-up call to bring one every time. You may have a bilge pump, but SOT paddlers rarely use one and often they are not stowed “at the ready.” A wake-up call for you!
Nonetheless, a pump or sponge from any source is necessary. In most cases with good bulkheads, a pump will hardly be necessary. The wet rescuee may bring into the kayak more water than it held after your draining. Kayaks with float bags, even if properly fitted, will have some considerable water, but are still better than kayaks without float bags.
Pump out the remaining water while you are still acting as an “outrigger.” You may be able to operate the pump, but it is wiser to maintain stability with your two-hand grasp while the rescuee does the pumping. If you are lucky a third kayak can raft up and assist.
When the water is out sufficiently (You can not get it all.) then the skirt, if any, needs to be replaced. Once again you may be able to assist with this, but maintaining stability with your grip is more important. The rescuee should start the skirt in the back, and you can then release your grip on the cockpit coaming as the skirt is secured to it. Then you must get the paddles out and ready to use.
I would suggest placing the paddles in a rafting position with paddle shafts across the rescuer’s lap and the rescuee’s spray deck. Then you can sort out any last details, each selects your own paddles, and with a gentle push, more forward or backward than sideways, you part ways. Another advantage of the bow to stern orientation is quick separation with plenty of paddle room.
Practice
Practice this T-Rescue with your sit-in-side paddling buddies. I think you will be surprised at their eagerness to give it try, at least in warm water and fair weather. Practice in rougher waters and less hospitable conditions will improve your skills to accommodate the conditions that are most likely to cause a capsize. Give that a try as soon as you have mastered the T-Rescue in easy water. If you encounter “sit-in-snobs” and need to defend your SOT, challenge them to a T-Rescue duel. Even if you do not win you should be able to gain their respect. Remind them that no matter how rough it gets and how many sit-ins swamp your sit-on kayak will not need bailing and will be ready for a T-Rescue of their sit-in kayak.