
Tidal currents can present some navigational and practical problems to kayakers. One cannot simply point their kayak at a target on the far shore and cross a strong tidal (or river) current in a straight line to it. A paddler must angle into the current to paddle against the flow while at the same time paddling across the water. This means that your kayak’s bow is not pointing at its destination.
Crossing Currents
The tidal flow into or out of a bay, estuary, or on tidal river can be quite strong. This includes some along-shore tidal currents and the flow of some freshwater rivers.
Small bodies of water with slow currents are usually not a concern, but when you wish to paddle across the current of a larger tidal flow, planning is needed. When a kayaker is navigating with a compass, in unfamiliar areas, over open water and/or when visibility is limited careful preparation is required.
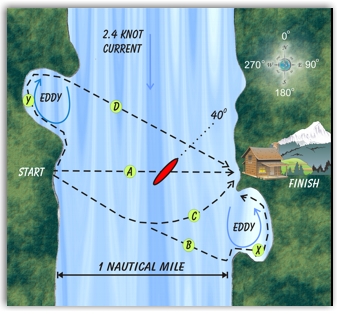
Path A in the diagram is the direct line across the current from “start” to “finish”. If the paddler chooses to point his kayak east and maintain a due East heading without angling into the current, they will follow path B, drifting downstream while crossing.
If a paddler simply aims for a visual landmark at the “finish,” he will follow path C drifting downstream while continually changing heading, always pointing his kayak to the goal. Naturally, at some point, there will be an upstream paddle at the end of the leg.
A kayaker can calculate the ferry angle needed to cross the water and keep up with the current. This can be done on the fly by the seat of your pants, simply using common sense and intuition, supplemented with a range and some trial and error.
However, in situations of low visibility, such as rain or fog, at night or when the goal on the far shore is not identifiable by sight (but known on the chart) a ferry angle must be figured out in advance. Otherwise, the kayaker could wait until slack tide (about one hour before to one hour after low or high) when the flow is at its slowest for the best shot at getting across, current free, without the need of calculating a ferry angle.
Alternatively, they may decide to go upstream against the current and then across, hoping that the current will take them to the finish point on path D, or paddle across, drifting downstream and then back upstream along the shore. Hopefully, our kayaker can take advantage of a back eddy to speed them on their upstream leg as depicted on routes X and Y. Also, currents in shallow water near the shore are often weaker than the main flow in the channel center. This will, of course, take more time and effort.
Paddlers may have limited options depending on their situation. Favorable upstream eddies may not be present. Waiting for slack tide may take too long. Unforeseen fog or the approach of nightfall can force one into navigating by compass. This is why it is good to have the skill of crossing currents in your bag of tricks and plan ahead.
Trip Plans
Plan your trip in advance and know the current speeds of tidal flows along your route. Make notes on your chart of the estimated current speeds, calculated ferry angles, crossing speeds, and anything else of interest.
These current speeds are often published in pilot books, such as Eldridge Tide & Pilot Book (for the US east coast).
You will find average current speeds and the direction they flow, published in coastal guidebooks for mariners when you look up a certain location. (Caution: Locations that are not of interest to larger vessels will not be included in pilot books.) Your coast pilot book will show the average maximum current speed at flood tide and ebb tide. Tides flow at their strongest during the middle 2 hours of the flood or the ebb cycle. The book will also have tide information to help you determine when high and low tides and the ebb and flood tides are for that location.
Flood = in the coming tide, after low tide, before high.
Ebb = outgoing tide, after high tide, before low tide.
The current speed can also be estimated before crossing from direct observation. Study drifting objects or the effect on buoys. Or, time your kayak’s drift in the current over a distance. (More on this subject in future articles).
Calculating Ferry Angle
For the purpose of this article, we will work with a current that crosses our path at 90 degrees, or nearly 90 degrees give or take 5-10 degrees. (Crossing currents at an oblique angle will be covered at a later date).
The amount of drift – called Set – is 6 degrees for a current that is 1/10 of your paddling speed. This may start to sound difficult but it gets easier.
Use this ratio. It is clearer and very practical:
Current Speed ÷ Paddling Speed X 60° = Ferry Angle
In our diagram, the current speed is 2.4 knots. A common paddling speed is about 3 knots. Insert the paddling speed, and the current speed, into the equation, then we can figure as such: 2.4 ÷ 3 X 60° = 48° our Ferry Angle (round it to 50°)
Our most direct course line across the current in the diagram is 90 degrees, due east. Adjust that by 50 degrees pointing upstream and our heading will be 40 degrees, roughly North East. Be sure to convert all your compass readings to magnetic so you can use a deck-mounted compass.
As we cross we will want to look for and use a range. In our diagram, we have a cottage on shore with a mountain in the distance that lines up directly with path A. While pointing the kayak at a 40-degree heading we can look to the east to see that the two landmarks are still in line as we cross the water. If they keep in line our estimation of the current speed, our paddling speed, and our math are all correct.
When we cannot maintain both the range and the ferry angle then we will have to adjust the ferry angle on the fly. If the cottage goes to the left of the mountain we are drifting downstream and have to increase the ferry angle. If the cottage goes to the right of the mountain we have to decrease the ferry angle.
It is a real world out there, not just paper and pencil. Your calculations will often need to be tweaked. Currents are stronger in the middle of the channel, coastal guides can be wrong, tidal flows are not consistent, changing from day to day, and your math can be flawed. Kayak navigation is part improvisation and part mathematical science.
A visual range can be very useful to adjust your ferry angle as needed. In fact a range can be so useful that you can create a ferry angle by trial and error as you cross a current. In low visibility such as fog and darkness, or in wide open water, a range is all but impossible and your calculations will be all that get you across.
For every current speed and average paddling speed, there will be a new set of numbers to insert into the equation above. As the current speed increases so do the ferry angle. The stronger the current the more you have to paddle against it. For example, with a current speed of four knots, your ferry angle could increase to 80 degrees, darn near paddling straight into the current, and thus not really ferrying at all, just holding position against the flow. We could say that ferry angles of 60, maybe 75 degrees, are the practical limit.
Each course line will have a different bearing and will be adjusted by the ferry angle. Each ferry angle is determined by the current speed and your paddling speed.
For example, using the same diagram, we wish to paddle back the way we came. The tide has reversed direction by now and current speed has changed to 1.2 knots. Our course line would be 270 degrees, due west. We still paddle about 3 knots, so our math would go as such:
1.2 ÷ 3 X 60° = 24°Ferry Angle (round it 25°)
We adjust our heading by pointing 25 degrees upstream and will point our kayaks to achieve a 245-degree heading, not quite southwest.
Now that we know how to calculate a ferry angle, we can cross a tidal current on a straight line and stick to that course, more or less. While we paddle along we will know where we are on the chart, but not know what point along that line we are actually positioned at.
To know exactly where we are on that line, at any given time, as we cross, we need to know the speed we are traveling at. To do this we need to know also what time we started and how much time has passed. This is why it is useful to have a waterproof watch.
Our actual speed or Speed Made Good, will not be our regular paddling speed of 3 knots, since paddling across the water and upstream at the same time takes more effort and more time than paddling across at slack water would.
We will want to know how long it will take to cross. If we had crossed in fog without any visual landmarks or a range and we were to take less time or more time, than anticipated it could indicate that we went off course, and we would not land at our intended spot.
The following crossing speeds are what we can expect depending on our ferry angle.
At a 60°ferry angle, the crossing speed will be 50% of the normal speed.
At a 50°ferry angle, the crossing speed will be 60% of the normal speed.
At a 45°ferry angle, the crossing speed will be 70% of the normal speed.
At a 30°ferry angle, the crossing speed will be 90% of normal speed.
At a 15°ferry angle crossing speed will be 100% of normal speed
Based on the information above I have prepared a table for our trip across the diagram using our normal paddling speed of 3 knots.
| Ferry Angle | Adjust Crossing speed by: | If the Normal Speed is 3 knots |
| 60° | 50% of normal paddling speed. | Crossing speed = 1.5 knots |
| 50° | 60% of normal paddling speed. | Crossing speed = 1.8 knots |
| 45° | 70% of normal paddling speed. | Crossing speed = 2.1 knots |
| 30° | 90% of normal paddling speed. | Crossing speed = 2.7 knots |
| 15° | 100% of normal paddling speed. | Crossing speed = 3 knots |
FYI: 1 knot = 1.15 MPH. One Nautical Mile = 1.15 Statute Miles
You can read Knots as MPH and Nautical Miles as Statute Miles if that will help you, but remember, 1 Knot does not equal one Mile Per Hour.
Our crossing on the diagram is exactly one Nautical Mile. At our normal paddling speed of 3 knots, no currents, it would take us 20 minutes to cross. When we cross the first time using a 50-degree ferry angle, our speed is reduced by 40% just to keep up with the current. That makes our Speed Made Good at 1.8 knots, meaning it will take 33 minutes to cross over.
On our return trip, with the change in tidal flow, we use a 25-degree ferry angle. That reduces our normal paddling speed by about 6.66%, making our speed made good 2.8 knots. We should be able to cross in about 21 and ½ minutes.
- As you cross, the current speed may change due to the underwater topography of the channel. The current can change speed on a long crossing as the tidal current weakens or strengthens. Vigilant use of multiple ranges, as they present themselves, may be needed.
- Will your crossing plan increase or decrease your time in a busy channel with Boat Traffic?
- Does the planed route and ferry angle increase or decrease the group’s exposure to wind, waves, etc?
- If trouble arises during the crossing where will the group drift off to? What would the result of drifting to there be?
Crossing with a ferry angle will always take less time than paddling up stream and then crossing with a down stream drift, path D, or crossing with a drift downstream and then paddling back up stream, plan B.
As you progress through your kayaking experiences seek to become better prepared with advance knowledge of the conditions you’ll face on your planned journeys. As you study charts, guidebooks and coast pilots look for easy currents to cross, for experience, and when you have mastered them you can then approach stronger currents and wider waters to paddle in.